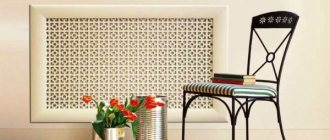
In order for the interior of the room to be perceived holistically and to evoke admiration, it is necessary to take care of all the nuances. An old radiator, like modern new radiators, can significantly worsen the appearance of a room. By hiding them from prying eyes, using a radiator grille on the radiator, you will make your home even more comfortable and beautiful.
Hanging grilles are characterized by a wide variety, so everyone can purchase the right option for themselves, depending on the features of the interior and their own taste.
The grille for the heating radiator can be made with your own hands. How to hide elements of the heating system will be discussed further.
Installing a screen on a heating radiator with your own hands
The installation will worsen the heating properties of the radiator.
To prevent this from happening, attach a reflector behind the radiator before installing the screen. The simplest reflector is foil. In this case, heat rays will be redirected back into the room, which will increase the level of heat transfer. Attention! If the inner surface of the product is painted black, the structure will heat up more from the radiator and itself transfer heat into the room. The design of the screen on the radiator is selected depending on the type of battery and the method of its installation
Before making a decorative element, think about how to dismantle it in the event of an accident, repair, replacement or simple cleaning
The design of the screen for the radiator is selected depending on the type of battery and the method of its installation. Before making a decorative element, consider how to dismantle it in the event of an accident, repair, replacement or simple cleaning.
Lattice
The grid screen is the simplest of the options for similar products. It is a flat panel consisting of a frame with wooden slats. The slats are placed horizontally, vertically, diagonally, in the form of cells. The last option looks the most attractive.
Manufacturing begins with the installation of a frame according to the size of the battery. Only dried material is used so that it does not deform or dry out during use.
Photo 1. A method of securely attaching openwork lattice cells to a wooden frame is demonstrated.
Then the required number of slats is attached to the frame using the chosen method. Before installation, parts are carefully polished and strengthened with special compounds. The slats are attached to the frame using glue or self-tapping screws. The finished product is coated with varnish or paint.
Box
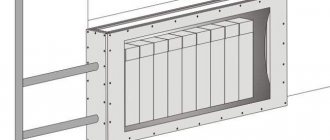
To make the screen-box, dimensions are taken from the radiator. The dimensions of the product will be 10 cm larger in width and 3-5 cm larger in height. First of all, the facade part is made. It is made in the form of a lattice panel or the necessary holes are cut out on a solid plate.
Important! You cannot cover the radiator with a screen more than 50%. Then the top and sides are made according to the dimensions
They can be lattice or solid. The parts are connected to each other by metal corners. To stabilize the screen, legs are attached at the bottom
Then the top and sides are made according to the dimensions. They can be lattice or solid. The parts are connected to each other by metal corners. To stabilize the screen, legs are attached at the bottom.
Kinds
Battery sheathings are made in several types:
- Flat, designed for installation in niches.
- Wall mounted ones without a cover hide batteries that do not protrude beyond the edge of the window sill.
- Wall-mounted ones, which have a removable lid on top, are used for radiators that protrude beyond the window sill.
Frame, which is a box that completely hides the placement of the radiator.
Screens for radiators made of solid wood differences:
- Possibility of manufacturing together with a window sill,
- without harmful emissions, unlike MDF,
- do not rust like metal, do not delaminate like MDF,
- do not warp when exposed to water,
- tinting in any color (with the possibility of repainting)
Decorative screens and grilles for radiators and heating radiators made of wood are made only to order, since there are no identical sizes for different interiors.
You can order a decorative screen for batteries by phone. To do this you need:
- know the dimensions of the opening for the screen,
- know the dimensions of the screen itself,
- know the color number if it is RAL or have a sample.
The most optimal options
The simplest and most inexpensive models will be those without sidewalls. They are compact, easy to install, and inexpensive. If the radiator deviates slightly from the plane of the wall, you should choose hanging grilles with a top cover. To completely hide the battery structure, you need to choose hanging boxes. At Les Massive, these products are available in a variety of sizes and styles at the best prices. The most popular are wooden radiators, which are completely environmentally friendly. Each product is described in detail in the electronic catalog, which helps with its selection. In addition to technical characteristics, its current price must be indicated.
How does the screen affect the heating process?
In pursuit of the external beauty of the product, one should not forget about its functionality - the screen should not interfere with effective heat exchange in the room. Do not be afraid that after installing the grille on the radiator, heat will be retained, which will provoke an increase in home heating costs. If you select the right design, such problems will not arise. Moreover, with the help of a special layout and configuration of the screen elements, you can even increase the amount of incoming heat.
The larger the holes, the more efficient the heat transfer
If you understand the operating principle of a standard heating radiator, then there will be no problems with choosing the correct design of a decorative screen.
Operating principle of a heating battery
When heated, the heating radiator transfers heat into the room as a result of the movement of heated air masses (convection process) and through direct thermal (infrared) radiation.
The principle of operation of the radiator
The effectiveness and priority of each of the two thermal energy transfer options may vary. This is influenced by the design of the radiator, the temperature of the coolant and air in the room, and the presence of obstacles in the path of heat flow.
So, at not too low temperatures, cast iron batteries give off heat according to the principle of convection, but after the coolant temperature rises to 70 degrees and above, heat is transferred using infrared radiation.
Main methods of heat transfer
So, in order to ensure free air circulation, the converter radiator is equipped with a grille that does not have an upper horizontal panel.
Warm air distribution
What to consider when choosing a grate
The main rule that must be observed when choosing a grille is that its design should not interfere with the free circulation of heated air and the passage of infrared radiation. This is possible if the front panel of the grille is equipped with a sufficient number of holes, amounting to at least 50% of the total area, and the free passage of warm air is ensured above the battery.
The holes at the top should not interfere with convection
It is also recommended that the material used has excellent thermal conductivity and allows air to flow freely into the room. If the inner surface of the screen is painted black or dark brown, the heat absorption will be better.
Installation stages and rules
You can install a ventilation grill with your own hands in a plastic or wooden window sill; installation in a concrete “board” will require much more experience and other tools. Otherwise, the grille is installed in a concrete window sill in exactly the same way.
Let's consider the nuances and stages of work for a plastic or wooden board and the same lattice. It is not necessary to remove the window sill to carry out the work. The direction of the slats (if the holes are slot-shaped and the slats are installed at an angle) should be towards the window.
A hole cut in the window sill for the ventilation grille
Tools you will need:
- Marking tool (marker, pencil).
- Jigsaw or grinder.
- Glue for plastic (optional).
- Any heavy object that can be used as a press (needed if the lattice will stick).
- Drill.
The diameter of the drill bit must be larger than the width of the jigsaw blade (so that it can fit into the drilled hole).
Stages of work
The process itself looks like this:
- Mark the place where the grille will be located.
- Holes are drilled in the corners.
- A jigsaw blade is inserted into the hole and a mounting hole is cut out for the grill itself.
- The product is installed in the hole for “trying on”.
- The edges of the hole are coated with glue.
- The grille is installed in place and pressed.
- The glue squeezed out along the edges is removed.
- Any heavy object is installed on top of the grate as a press.
Hole in the window sill for installing a grill
Metal products (as well as some plastic and wooden ones) are attached not with glue, but with bolts.
Using glue is not an ideal solution - in this case the structure will be solid. If necessary (for example, if the plastic lamella breaks), the grille will have to be torn off from the surface.
You don’t have to use glue if the groove is perfectly even: so that the lattice “sits” tightly in it without moving. In this case, if necessary, it can be pulled out - for replacement, repair or cleaning.
Prices for screen-lattice made of pine “double strapping”:
| Name | Cell size (mm) | Price |
| Pine grid No. 10 | To order, according to your dimensions Cell 70x70 mm Frame beam 40x40 mm | 2800 rub. |
| To order, according to your dimensions Cell 100x100 mm Frame beam 40x40 mm | 2600 rub. | |
| To order, according to your dimensions Cell 120x120 mm Frame beam 40x40 mm | 2500 rub. | |
| To order, according to your dimensions Cell 150x150 mm Frame beam 40x40 mm | 2400 rub. |
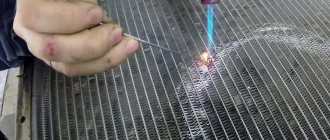
DIY metal screen
You can use a perforated metal sheet or expanded mesh as a panel for the screen. There are ready-made expanded metal mesh with anti-corrosion treatment (for steel) and enamel decorative coating. Such a mesh can be fixed to a wooden frame and used in the structures described above.
But metal has a serious advantage over wood - a high thermal conductivity coefficient. This property allows you to make screens that rest directly on the battery. They even increase its heat transfer by increasing the surface area. Moreover, a battery with such a screen works better not only for radiation, but also for convection - just look at the ribbed heating elements of convectors.
It is better to choose an aluminum corner for the frame, and an aluminum sheet or expanded mesh for the screen panel. They are easier to work with, and the thermal conductivity of aluminum is almost 5 times higher than that of steel.
A hanging metal screen is quite simple to make:
- Take two corners with a length equal to the sum of the height of the screen and the depth of the battery.
- Along the fold line on one of the walls of each corner, two counter cuts are made with a total angle of 90° (45° for each relative to the edge of the corner). Moreover, the cuts must be made so that the uncut walls of the corners face each other.
- Bend the corners in the shape of the letter G.
- Prepare a blank for the screen from a perforated sheet or expanded mesh. Its length is equal to the total length of the L-shaped corner.
- Three corners are made with a size equal to the width of the screen.
- Bend the screen blank and attach it to the L-shaped corners using screws and nuts with washers (in holes specially drilled in the corners). It is better to drill holes in place so that they fit into the perforation of the sheet or into the mesh cell.
- On the inside of the mesh, three corners are attached in the corner and along the edges, which serve as stiffening ribs.
- Paint the outer part of the L-shaped corners.
To ensure that such a screen is in a stable position, you can fix a pair of dowels with straight hooks in the wall, and drill holes for them in the short parts of the L-shaped corners.
Branded or homemade?
And this is up to anyone. My good friend, Kulibin from God, made himself a whole set of universal nets, which he adjusted to his Chevrolet. But he is a hands-on fan with a lot of free time. He tried both rigidly fixed and removable structures, securing his crafts with screws or clips. Material: aluminum or plastic. Aluminum is light and durable, but a friend says that over time it quickly fades. Plastic is easy to process, but its strength is not so great. That's why his latest craft is made entirely of stainless steel! It looks decent, but it’s better not to ask about the cost and fuss...
As for the type of fastening, the removable screens are easy to remove for cleaning, but on the road they like to rattle obnoxiously. On the contrary, the tightly fixed structure does not make any sounds when driving, but, frankly, it is inconvenient to clean it.
Installation of the outer grille element - metal frame
Window grilles are made both with and without an element such as a metal frame.
To produce a similar version of a window grille without a frame, use only:
- steel strip;
- reinforcing rod.
If you need to install bars on the windows of a country house, then welding and forging elements are unlikely to be needed. Especially if the house is simple, wooden. In this option, the vertical parts are located at a considerable distance from each other, so that natural light will not be obscured.
Grille without external metal frame
Step one. A metal strip 4 mm thick and 40 mm wide is used. But the length depends on the following factors:
- how wide is the window opening;
- how many crossbars are there in the lattice?
You will also need smooth reinforcement Ø 14 mm. The length of the reinforcing bar will depend on:
- on the required number of vertical elements;
- from the height of the window.
In addition, you will need to have a threaded rod Ø 10-12 mm.
To create the main grille (horizontal), you will need to stock up on two metal strips of sufficient length. Their size should be 5 mm less than the width of the window opening. The strips will need to be secured in the lower and upper areas of the grille.
The third strip will be installed in the middle part of the structure. This strip will become the connecting link between several middle or all reinforcement bars.
Step two. An auxiliary reinforcing bridge will need to be welded into the central part of the grille.
Step three. Now you need to process the metal strips, cut according to the required dimensions. The edges of the strips are rotated 90 degrees.
Step four. The edges of the strips are highlighted - approximately 10-12 cm. The edge is laid on the table and securely fastened to the metal tabletop. Through a gasket strip made of metal, that is, quite strong, this element is tightened with two clamps. You can clamp the strip in a large vice.
Tightening metal strips with two clamps
A gas wrench is used to grab the free edge of the strip and slowly turn it at a right angle. Such actions are carried out with each long side of the strip.
Step five. When the strips are prepared, markings are made on them in order to drill a hole, the diameter of which is 1-2 mm larger than the same parameter of the reinforcement bars. A hole Ø 15-16 mm is drilled.
Now the strip can be moved to make another hole at the same distance from the previous one. Such actions will be carried out until the last hole is drilled.
Step six. The holes are drilled, you can insert reinforcement rods into them. The grille elements are assembled into a common structure and fastened together by welding.
Step seven. When bending the edges, the mounting areas of the strips are highlighted. Markings are made on them to weld the threaded rods. Each of the pins should have a length equal to the thickness of the window block with an addition of 3 cm (1-2 cm should be removed from the edge). These additional 3 centimeters will be required to screw the locking nuts from inside the room.
Step eight. You need to weld the studs to the side of the strip that will press against the window frame. Welding should be a continuous seam. After welding, a nut will be immediately screwed onto the stud.
Assembling a grille with two transverse stripes
Step nine. To clean the grate from rust, use an iron brush. After this, each grille element is wiped with a degreasing solution. You need to wait until the solvent evaporates and the grate dries.
Step ten. Next, the window frame is marked and holes are drilled in the designated areas. Then the grille will be attached to the window block through welded pins inserted into the holes.
Step eleven. You can lift the grille and press it against the window block with the ends of the pins. Then there will be points on the frame that have the meaning of marks. Holes are subsequently drilled through these marks.
Welding studs
It is advisable to drill holes using a wood drill. Its diameter should be 2-2.5 mm wider than the diameter of the stud. Then the pin will fit freely but tightly into the “socket”. The drill must have a length that exceeds the thickness of the window block by at least 1 cm.
Step twelve. The grille is mounted on the frame. For this purpose, you will need to insert pins into the holes of the window block. From the inside, put washers of sufficient width on and tighten the nuts.
Video: How to make window bars with your own hands:
Radiator measurements
When planning the installation of the grille, you should take measurements. You need to add 10 cm to the resulting width of the battery. Add about 5 cm to the distance from the floor to the top of the radiator. The depth of the screen should be 3 cm greater than the distance from the front of the radiator to the wall.
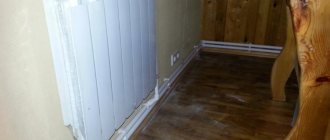
The radiator grille screen must cover the radiator. The grille itself is attached to the floor and wall, and the radiator is covered with a window sill on top.
Installing a screen for a heating battery with your own hands
Screens for radiators are a modern solution to the problem of obsolete heating elements that do not fit well into the interior. Being relatively cheap and easy to install, the screen eliminates the need to replace the radiator and supply pipes.
The screen for the battery is hung either on special brackets or directly on the elements of the heating system, which makes installation possible even without special skills and permits within 15-20 minutes.
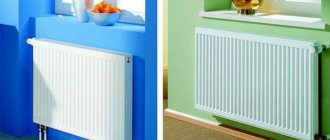
Battery screens are metal products that visually cover heating radiators that are not very pleasant in appearance, most of which are a decorative mesh for heat transmission. Screens for batteries are very relevant when carrying out European-quality renovations, as they can give the room a finished look.
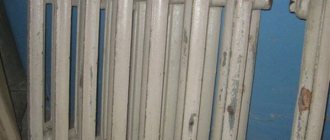
Probably, many will agree that beautiful curtains or stylish blinds do not look at all with “Soviet”-style radiators, even if they are painted. In addition, the shape of previously manufactured batteries no longer looks so aesthetically pleasing. Screens on radiators will help solve the problem.
They will hide the unsightly looking pipes. In addition to decorative functions, battery screens perform several protective functions. Everyone knows how quickly dust settles on a battery. Radiator screens installed in the apartment serve as an excellent barrier to the “ubiquitous” dust.
But not only this function ensures demand for our products. Outdated batteries often cause injuries. This circumstance must be taken into account if children live in the apartment. Due to the absence of sharp parts in the design, these products are absolutely safe.
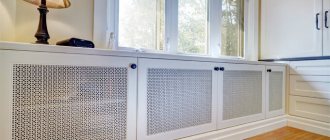
The perforated screen is more environmentally friendly. It looks much sleeker than its metal brother. You can make patterns at the request of the client, which will increase the cost of the product, and, consequently, your profit. To make a radiator, we will need a wooden plank, plywood or chipboard, a sheet of perforated chipboard, a saw or jigsaw, self-tapping screws, paint, varnish, and foil. Most likely, you have the tools, and the materials are easy to buy at the construction market or stores like OBI.
To begin with, it is worth constructing two square profiles according to the size of the battery with an allowance of 5-7 cm on the sides, and on the bottom side to the floor. After which the top, them and sides of the profiles are sheathed with plywood, plasterboard or chipboard around the perimeter, leaving the back and front sides open.
Then we put a sheet of foil behind the battery, put on the screen and connect the entire structure. Foil is needed for better heat reflection. If the pipes approach the radiator from the side, you will need to cut a hole to fit the screen.
Another option is to not make side walls and put the screen on top. The choice is at the discretion of the customer. After that, all you have to do is cut out the decorative grille from perforated chipboard to size and attach it to the screen from the front side. Next, the screen can be painted or varnished to give the desired shade.
First you need to soak the rattan fabric in warm water in a bathtub or in a large basin for about two hours, so that it is easier to stretch the fabric onto a wooden frame, since when dry it is very hard and fragile at the same time.
Assemble the wooden frame. To do this, you will need ordinary wooden slats of approximately 2x3cm. (photo attached). Stretch the fabric over the frame and secure it with small nails or a furniture stapler and leave to dry.
Then connect the platbands to each other at right angles, using the same furniture stapler. When the individual parts of the screen are ready, you need to screw the frame to the frame from the platband with screws from the inside.
Naturally, before work you carefully measure the size of the hole in the wall in front of the battery. So that later the frame fits exactly into the opening. By the way, if the designer is sleeping in you, then the trims can be painted using the craquelure technique, or you can choose the trims not in the color of the walls, but, for example, in the color of the baseboard, this is something anyone has enough imagination for, it looks simply gorgeous!
The result of the work done is attached for viewing.
Glass screen
In principle, you can order self-adhesive film with large format printing for a glass screen. You can also make a design on a matte or transparent surface using sandblasting or paste for chemical etching of glass.
If you don’t want to bother with decorative processing, then glass with a matte surface or painted in bulk is available for sale - you just need to order the desired size, and you can process the edge yourself. The only condition is that the glass must be tempered.
The simplest option for installing a screen is to point-mount the glass to the wall in four places. To do this, use special fittings with remote fastening.
But there is one drawback - you need to drill holes in tempered glass, and this is difficult to do at home.
Therefore, it is better to use a cold-rolled thin-walled pipe as the supporting structure of the screen. It (and fastenings for it and glass) are sold in stores that sell everything necessary for making furniture. As a rule, such pipes and fasteners are made chrome, but you can order them to be painted in any shade from the RAL palette. The screen stands are attached to the floor.
As an additional support for the racks, two remote adjustable fasteners of a closed type (with a plug for the pipe) can be attached to the wall. The glass is secured between the posts using clamps.
rmnt.ru
Prices for lattice screens made of beech and oak
| B-6 (beech) | |
| Cell: 15mm x 15mm Beam size: 9mm x 12mm | |
| 500x2000 | 2100 RUR/pcs. |
| 500x2500 | 2630 RUR/pcs. |
| 600x2000 | RUB 2520/pcs. |
| 600x2500 | 3150 RUR/pcs. |
| 700×2000 | 2940 RUR/pcs. |
| 700x2500 | 3680 RUR/pcs. |
| 800x2000 | RUB 3,360/pcs. |
| 800x2500 | 4200 RUR/pcs. |
| 900x2000 | 3780 RUR/pcs. |
| 900x2500 | 4730 RUR/pcs. |
| D-6 (oak) | |
| Cell: 15mm x 15mm Beam size: 9mm x 12mm | |
| 500x2000 | 2200 RUR/pcs. |
| 500x2500 | 2750 RUR/pcs. |
| 600x2000 | 2640 RUR/pcs. |
| 600x2500 | 3300 RUR/pcs. |
| 700x2000 | 3080 RUR/pcs. |
| 700x2500 | 3850 RUR/pcs. |
| 800x2000 | 3520 RUR/pcs. |
| 800x2500 | 4400 RUR/pcs. |
| 900x2000 | 3960 RUR/pcs. |
| 900x2500 | 4950 RUR/pcs. |
| B-7 (beech) | |
| Cell: 10mm x 10mm Beam size: 7mm x 8mm | |
| 500x2000 | 2200 RUR/pcs. |
| 500x2500 | 2750 RUR/pcs. |
| 600x2000 | 2640 RUR/pcs. |
| 600x2500 | 3300 RUR/pcs. |
| 700x2000 | 3080 RUR/pcs. |
| 700x2500 | 3850 RUR/pcs. |
| 800x2000 | 3520 RUR/pcs. |
| 800x2500 | 4400 RUR/pcs. |
| 900x2000 | 3960 RUR/pcs. |
| 900x2500 | 4950 RUR/pcs. |
| D-7 (beech) | |
| Cell: 10mm x 10mm Beam size: 7mm x 8mm | |
| 500x2000 | 2350 RUR/pcs. |
| 500x2500 | 2940 RUR/pcs. |
| 600x2000 | 2820 RUR/pcs. |
| 600x2500 | 3530 RUR/pcs. |
| 700x2000 | 3290 RUR/pcs. |
| 700x2500 | 4120 RUR/pcs. |
| 800x2000 | 3760 RUR/pcs. |
| 800x2500 | 4700 RUR/pcs. |
| 900x2000 | 4230 RUR/pcs. |
| 900x2500 | 5290 RUR/pcs. |
| D-9 (oak) | |
| Cell: 15mm x 15mm Beam size: 15mm x 20mm | |
| 700x1000 | 1330 RUR/pcs. |
| 700x1200 | 1600 RUR/pcs. |
| 700x1500 | 2000 RUR/pcs. |
| 900x1000 | 1710 RUR/pcs. |
| 900x1200 | 2060 RUR/pcs. |
| 900x1500 | 2570 RUR/pcs. |
| D-15 (oak) | |
| Cell: 12mm x 12mm Beam size: 15mm x 15mm | |
| 700×1000 | 1330 RUR/pcs. |
| 700x1200 | 1600 RUR/pcs. |
| 700x1500 | 2000 RUR/pcs. |
| 900x1000 | 1710 RUR/pcs. |
| 900x1200 | 2060 RUR/pcs. |
| 900x1500 | 2570 RUR/pcs. |
| D-11 (oak) | |
| Cell: 40mm x 40mm Beam size: 9mm x 12mm | |
| 900x2000 | RUB 2520/pcs. |
| 900x2500 | 3150 RUR/pcs. |
| B-11 (beech) | |
| Cell: 40mm x 40mm Beam size: 9mm x 12mm | |
| 900x2000 | 2700 RUR/pcs. |
| 900x2500 | 3380 RUR/pcs. |
| B-18 (beech) | |
| Large cell: 40mm x 40mm Small cell: 40mm x 15mm Beam size: 15mm x 15mm | |
| 700x2000 | 2380 RUR/pcs. |
| 700x2500 | 2980 RUR/pcs. |
| 900x2000 | 3060 RUR/pcs. |
| 900x2500 | 3830 RUR/pcs. |
| D-18 (oak) | |
| Large cell: 40mm x 40mm Small cell: 40mm x 15mm Beam size: 15mm x 15mm | |
| 700x2000 | RUB 2520/pcs. |
| 700×2500 | 3150 RUR/pcs. |
| 900x2000 | 3240 RUR/pcs. |
| 900x2500 | 4050 RUR/pcs. |
| Frame timber made of oak (groove 11x10mm) | |
| Section: 20mm x 45mm Suitable for: B-6; D-6; D-11; B-18; D-18. | |
| 2000 | 600 RUR/pcs. |
| 2500 | 750 RUR/pcs. |
| Frame timber made of oak “Double” (groove 11x10mm) | |
| Section: 20mm x 45mm Suitable for: B-6; D-6; B-11; D-11; B-18; D-18. | |
| 2000 mm | 700 RUR/pcs. |
| 2500 mm | 880 RUR/pcs. |
| Frame timber made of oak (groove 9x10mm) | |
| Section: 20mm x 45mm Suitable for: B-7; D 7. | |
| 2000mm | 600 RUR/pcs. |
| 2500mm | 750 RUR/pcs. |
| Frame timber made of oak “Double” (groove 9x10mm) | |
| Section: 20mm x 45mm Suitable for: B-7; D 7. | |
| 2000 mm | 700 RUR/pcs. |
| 2500 mm | 880 RUR/pcs. |
| Frame timber made of oak (groove 18x15mm) | |
| Section: 30mm x 45mm Suitable for: D-9; D-15. | |
| 2000 mm | 900 RUR/pcs. |
| 2500 mm | 1130 RUR/pcs. |
| Frame timber made of oak “Double” (groove 18x15mm) | |
| Section: 30mm x 45mm Suitable for: D-9; D-15. | |
| 2000 m | 1000 RUR/pcs. |
| 2500 mm | 1250 RUR/pcs. |
| Wood type | Additional Information | Canvas size | Price |
| B-6 (beech) | Cell: 15mm x 15mm Beam size: 9mm x 12mm | 500x2000 | 2100 rub. |
| 500x2500 | 2630 rub. | ||
| 600x2000 | 2520 rub. | ||
| 600x2500 | 3150 rub. | ||
| 700×2000 | 2940 rub. | ||
| 2100 RUR/m2 | 700x2500 | 3680 rub. | |
| 800x2000 | 3360 rub. | ||
| 800x2500 | 4200 rub. | ||
| 900x2000 | 3780 rub. | ||
| 900x2500 | 4730 rub. | ||
| D-6 (oak) | Cell: 15mm x 15mm Beam size: 9mm x 12mm | 500x2000 | 2200 rub. |
| 500x2500 | 2750 rub. | ||
| 600x2000 | 2640 rub. | ||
| 600x2500 | 3300 rub. | ||
| 700x2000 | 3080 rub. | ||
| 2200 RUR/m2 | 700x2500 | 3850 rub. | |
| 800x2000 | 3520 rub. | ||
| 800x2500 | 4400 rub. | ||
| 900x2000 | 3960 rub. | ||
| 900x2500 | 4950 rub. | ||
| B-7 (beech) | Cell: 10mm x 10mm Beam size: 7mm x 8mm | 500x2000 | 2200 rub. |
| 500x2500 | 2750 rub. | ||
| 600x2000 | 2640 rub. | ||
| 600x2500 | 3300 rub. | ||
| 700x2000 | 3080 rub. | ||
| 2200 RUR/m2 | 700x2500 | 3850 rub. | |
| 800x2000 | 3520 rub. | ||
| 800x2500 | 4400 rub. | ||
| 900x2000 | 3960 rub. | ||
| 900x2500 | 4950 rub. | ||
| D-7 (oak) | Cell: 10mm x 10mm Beam size: 7mm x 8mm | 500x2000 | 2350 rub. |
| 500x2500 | 2940 rub. | ||
| 600x2000 | 2820 rub. | ||
| 600x2500 | 3530 rub. | ||
| 700x2000 | 3290 rub. | ||
| 2350 RUR/m2 | 700x2500 | 4120 rub. | |
| 800x2000 | 3760 rub. | ||
| 800x2500 | 4700 rub. | ||
| 900x2000 | 4230 rub. | ||
| 900x2500 | 5290 rub. | ||
| D-9 (oak) | Cell: 15mm x 15mm Beam size: 15mm x 20mm | 700x1000 | 1330 rub. |
| 700x1200 | 1600 rub. | ||
| 700x1500 | 2000 rub. | ||
| 1900 RUR/m2 | 900x1000 | 1710 rub. | |
| 900x1200 | 2060 rub. | ||
| 900x1500 | 2570 rub. | ||
| D-15 (oak) | Cell: 12mm x 12mm Timber size: 15mm x 15mm | 700×1000 | 1330 rub. |
| 700x1200 | 1600 rub. | ||
| 700x1500 | 2000 rub. | ||
| 1900 RUR/m2 | 900x1000 | 1710 rub. | |
| 900x1200 | 2060 rub. | ||
| 900x1500 | 2570 rub. | ||
| D-11 (oak) | Cell: 40mm x 40mm Beam size: 9mm x 12mm | 900x2000 | 2700 rub. |
| 1500p./m2 | 900x2500 | 3380 rub. | |
| B-11 (beech) | Cell: 40mm x 40mm Beam size: 9mm x 12mm 1400p./m2 | 900x2000 | 2520 rub. |
| 900x2500 | 3150 rub. | ||
| B-18 (beech) | Large cell 40mm x 40mm Small cell 40mm x 15mm + 15mm x 15mm Beam size: 9mm x 12mm | 700x2000 | 2380 rub. |
| 700x2500 | 2980 rub. | ||
| 1700 RUR/m2 | 900x2000 | 3060 rub. | |
| 900x2500 | 3830 rub. | ||
| D-18 (oak) | Large cell 40mm x 40mm Small cell 40mm x 15mm + 15mm x 15mm Beam size: 9mm x 12mm | 700x2000 | 2520 rub. |
| 700×2500 | 3150 rub. | ||
| 1800 RUR/m2 | 900x2000 | 3240 rub. | |
| 900x2500 | 4050 rub. | ||
| Frame timber made of oak (groove 11x10mm) | Section: 20mm x 45mm Suitable for: B-6; D-6; D-11; B-18; D-18. | 2000 | 600 rub. |
| 2500 | 750 rub. | ||
| Frame timber made of oak “Double” (groove 11x10mm) | Section: 20mm x 45mm Suitable for: B-6; D-6; B-11; D-11; B-18; D-18. | 2000 mm | 700 rub. |
| 2500 mm | 880 rub. | ||
| Frame timber made of oak (groove 9x10mm) | Section: 20mm x 45mm Suitable for: B-7; D 7. | 2000 | 600 rub. |
| 2500 | 750 rub. | ||
| Frame timber made of oak “Double” (groove 9x10mm) | Section: 20mm x 45mm Suitable for: B-7; D 7. | 2000 mm | 700 rub. |
| 2500 mm | 880 rub. | ||
| Frame timber made of oak (groove 18x15mm) | Section: 28mm x 45mm Suitable for: D-9; D-15. | 2000 | 900 rub. |
| 2500 | 1130 rub. | ||
| Frame timber made of oak “Double” (groove 18x15mm) | Section: 30mm x 45mm Suitable for: D-9; D-15. | 2000 m | 1000 rub. |
| 2500 mm | 1250 rub. |
Advantages and disadvantages
I have made my choice - next weekend I will equip my machine with a branded mesh. However, minor troubles are possible - I studied the list of them myself and want to share with everyone.
Cooling of the radiator by the incoming air flow after installing the mesh will deteriorate somewhat, and the thermal regime of the motor will change. Well, this is an expected phenomenon. When I installed nets on plastic windows at home, they tried to impose on me an “ideal net” with the smallest cells, through which “nothing could get through at all.” But it is, to put it mildly, difficult for air to pass through such a mesh - it’s easier not to open the window at all... Therefore, you can’t install a completely fine-mesh mesh. True, dirt will still penetrate through large cells. But this, it seems to me, is obvious.