Icer
8024 0 2
Icer September 6, 2016Specialization: master in the construction of plasterboard structures, finishing work and laying floor coverings. Installation of door and window units, finishing of facades, installation of electrical, plumbing and heating - I can give detailed advice on all types of work.
If you want to use a country house or country house for winter living or sometimes spend time in it during the cold season, you must take care in advance of effective thermal insulation of the structure. I will tell you about my work experience, which gave excellent results. There is nothing complicated in the process, you just need to repeat all the steps outlined in the review and use high-quality materials for maximum insulation efficiency.
In the photo: the ideal option is insulation during construction, but work can also be carried out on an already built dacha
Why insulate
Insulating your dacha will allow you to save on heating costs in winter.
Modern heating systems are able to create the desired temperature in the room, so why is it necessary to take additional measures. Insulating a country house will allow the owner to solve the following problems:
- high heating costs;
- the appearance of condensation on the walls and ceiling;
- violation of the operating conditions of structures and their destruction.
If during the cold season there is a positive temperature inside the house, but its enclosing structures are not insulated enough, this will lead to many problems, which are easier to prevent than to fix with your own hands.
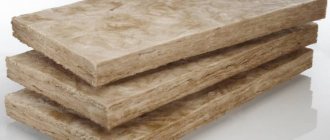
Recommended material for insulating walls in a country house - ISOVER Warm Walls Strong
Material parameters
| Thickness, mm | 50 | 100 | ||
| Width, mm | 610 | |||
| Length, mm | 1000 | |||
| Quantity per package, m2 | 6.1 | 3.05 | ||
| Quantity per package, m3 | 0.305 | 0.305 | ||
| Quantity per package, pcs | 10 | 5 | ||
Buy now
Materials for thermal insulation
The building materials market offers a huge range of types and manufacturers of thermal insulation materials. It’s easy to get lost in this variety. The choice depends on the location of the thermal insulation and the wishes of the home owner. The main heat insulators include:
Main thermal insulators of the house
- Mineral wool. Available in the form of mats (rolls) and rigid slabs. The first option is suitable for walls and floors along joists, the second for walls, floors, and roofs. The advantages include non-flammability, high efficiency, durability, resistance to rot and mold. The disadvantage is the ability to absorb moisture. It is important to remember that when working with this material you need to use masks, gloves and protective clothing. Neglecting safety measures will lead to cotton particles getting on the skin and into the lungs, and ultimately to irritation and allergic reactions.
- Styrofoam. The material is made of polystyrene. It is a slab of small balls filled with air. The undeniable advantage was the low cost of the material and availability. There are quite a lot of disadvantages. These include flammability, inability to pass air (the house will need additional ventilation), low strength and instability to simultaneous exposure to moisture and low temperatures. Suitable for do-it-yourself insulation of walls (it is recommended not to use outside), ceilings (better for insulation from below), and attic roofs.
- Extruded polystyrene foam (penoplex). The material is similar to foam, but is an improved version of it. It is low flammable, has increased strength and moisture resistance. Disadvantages include airtightness. Suitable for insulating walls and floors (both between floors and on the ground).
- Expanded clay. Inexpensive material. Compared to the previous three, it is not highly effective. It is small granules of baked clay, free-flowing. Disadvantages include high thermal conductivity and large mass. Suitable for insulating floors (at the same time leveling the surface).
There are also a number of less common materials, these include:
- polyurethane foam;
- ecowool (insulation mats made of flax);
- penoizol (foamed polymer resin);
- isokom (foil material);
- sawdust.
Insulation process
I will talk about the work, dividing it into six parts, so it will be easier for you to understand the nuances of insulation, and you will be able to plan all the actions in the correct sequence. There are no trifles here - the more meticulously you approach the process, the better the result you will get in the end.
Stage No. 1 – windows
You need to start work with this part of the structure. Why? It's simple: if you do not insulate the window openings in advance, then when insulating the walls from the outside or inside you will not be able to make openings, and without this it is very, very difficult to achieve an ideal appearance.
The main recommendations are:
- First of all, you need to assess the condition of the existing window structures; if the wood is severely damaged and restoring it will be problematic, then it is better to order new window units . The ideal solution is plastic double-glazed windows, but if you cannot afford to install them, then it’s okay - if you wish, you can also qualitatively insulate an ordinary wooden window;
Plastic windows are great for a country house
- Frames must have double glazing; single glass is a weak barrier to cold . It is best to use either a double frame design or insert a second frame for the winter, as is still done in rural areas. That is, you need to measure the size of the opening and make a separate structure that will be installed during the cold period; this is the cheapest solution of all possible;
An additional frame is an excellent solution for the winter
- I advise you to disassemble the structure; if there are cracked glasses, they need to be replaced, and also stock up on new beads in advance . The glass is sealed with silicone sealant around the entire perimeter, this will significantly reduce heat loss through the joints. It is also advisable to coat the bead with sealant, after which it is fixed with nails; this option ensures maximum reliability;
To make the joints at the corners perfect, it is better to cut the glazing bead using a miter box
- Another important part of the work is sealing the joint between the frame and the sash or sash . It is best to use a special sealant with a self-adhesive base; it is sold in hardware stores by the meter, so you need to first take all the necessary measurements. A cheaper solution is foam rubber tape for insulating windows; it is also glued around the perimeter, but unlike the first option, its service life is only one season;
The tape securely covers the joint; it is important to secure it around the entire perimeter
- If there are gaps and cracks on the frame and sashes, they need to be sealed with putty, after which the surface is painted . It is important to protect wood from adverse influences, since moisture and temperature changes deform the structure, and over time the material begins to rot;
- It is very important to properly insulate the joint between the frame and the wall; all cracks wider than 5 mm are easiest to fill with polyurethane foam ; it is important that there are no voids inside the structure. As a last resort, you can fill the space with batting, tow and other materials, but this option can be considered as temporary; subsequently it is better to use polyurethane foam;
Foam allows you to quickly and efficiently fill joints
- All joints, especially on the outside, must be covered with either a wooden frame or other materials and additionally protected from moisture using silicone sealant. The fact is that foam does not tolerate ultraviolet radiation well and, under its influence, begins to deteriorate very quickly;
- As a more radical option, you can consider using shutters; they close when necessary and allow you to create an additional barrier to the cold. But it is much easier to install good frames than to build such a structure.
If you urgently need to insulate your windows in winter, then use the option with plastic film - take a piece larger than the size of the window and attach it around the perimeter using a stapler.
Stage No. 2 – door
An ordinary summer house usually has a more or less strong door, the only function of which is to protect against entry. But if you want to use the structure in winter, then the structure should provide excellent protection from the cold.
Let's figure out how to properly insulate this part of the structure:
- The most important thing is that the front door should not go directly into the living space . Be sure to provide a dressing room; if there is none, then fence off a small part of the space. There should be such a barrier between the street and the house; this will significantly reduce heat loss through the door block;
- As for the door material, it is most often wood, although recently metal options are increasingly being used. Here it is important to choose a design with a thicker leaf, and if you have a metal door, then it is advisable that it be filled with mineral wool insulation;
- Let's figure out how you can modify an ordinary wooden door; first of all, you need to seal all the cracks and cracks with a special putty. After this, apply 2 layers of paint or varnish to protect the material from moisture;
All defects are eliminated, because every crack is a place of potential heat loss
- If you need to insulate a structure, the simplest option is to cover the surface with batting or foam rubber . From the outside, the surface is covered with leatherette; to better protect the joints, rollers are made around the perimeter, they seal the junction points;
Rollers around the perimeter - an additional barrier to the cold
- Additional tightness between the door leaf and the frame is ensured by the presence of a special rubber seal . It is glued around the perimeter in a matter of minutes and performs two functions at once: with it, heat loss is significantly reduced, and the door closes more softly. The seal is sold by the meter and has a self-adhesive side for quick installation;
The seal can be bent in the middle and attached to the inner corner of the door frame
- As an option that is suitable for both wooden and metal structures, you can consider using mineral wool or foam plastic on the inside of the canvas. The material can be used to fill the internal cavities, or it can be attached to the outside, it all depends on the characteristics of the door;
Polystyrene foam and mineral wool improve the thermal insulation of the door significantly
As a quick option for improving the thermal insulation of a doorway, I can recommend a curtain made of thick material, a blanket or something similar will do. It’s not very pretty, but it’s very effective, if you don’t believe me, try it.
- As for the connection of the box to the wall, it is filled with polyurethane foam, the excess of which is cut off after drying . Next, you need to close the cracks with a platband or some kind of plank, this will protect the foam and create an additional barrier to the penetration of cold.
Stage No. 3 - ceiling
Do you know that 20 to 25% of heat is lost through a poorly insulated ceiling? This is due to the fact that when heated, the air always rises, and if the structure is not thermally insulated, then it turns out that you are heating the street. Just recently I wrote a detailed review on ceiling insulation, read it and you will understand this part of the work very well.
The ceiling must be insulated efficiently and reliably
Here I will briefly talk about the most popular insulation options:
- The most budget-friendly solution is to use sawdust; in order to protect the material from dampness, it must be mixed with lime . The minimum layer of material is 20 cm, but for effective insulation it is advisable to add 25-30 cm. The greatest advantage is the affordable price, but other indicators leave much to be desired;
- Using clay involves making a solution with sawdust , this increases the strength of the layer and makes this technology more reliable than the one described above. The advantage is the low cost, but the work is quite labor-intensive: you need to dig up the clay, prepare a solution of the correct consistency, after which it needs to be evenly distributed over the surface and leveled, it dries for at least a month;
Preparing a solution from sawdust with clay is a labor-intensive process
- Expanded clay is a good option; this insulation is very popular due to its low cost, light weight and fire safety. The technology for its application is very simple: you need to fill the material on the ceiling with a layer of 20 cm or more. An additional advantage of this material is that it absorbs excess moisture from the air, maintaining optimal humidity in the room;
- Polystyrene foam is a very popular solution today; insulation is affordable and easy to use . The technology for carrying out the work is not at all complicated: you need to prepare the surface by leveling it and laying a waterproofing, vapor-permeable membrane. The sheets are laid in a layer of 100 mm or more, all cracks and joints at the junctions are sealed with polyurethane foam, it serves as a heat insulator and as glue;
The foam should be placed as tightly as possible, but make sure that it does not break
- Mineral wool is another modern, effective option for ceiling insulation . The advantage of this material is its ease of use and high thermal insulation performance, the disadvantage is that the cost will be higher than all the options described above, although it cannot be called very high either. When laying, the main thing is to fill the space tightly; the layer thickness should be at least 100 mm, but it is better if it is 150-200 mm;
When working with mineral wool, be sure to use gloves and a respirator.
- Another option is to use sprayable compounds like penoizol. The advantage of this solution is its simplicity: specialists will do all the work for you, the disadvantage is the high cost.
If your country house design does not have an attic, you will have to insulate the ceiling from the inside. For this type of work, foam plastic or extruded polystyrene foam is best suited; these materials are simply glued to the surface using a special compound, after which all joints are also sealed.
The main thing is to firmly glue the material to the surface.
What is the best way to insulate a ceiling? It's up to you to decide, personally I lean towards mineral wool as it is very effective and easy to use. There is no point in saving on insulating your house.
Stage No. 4 - floor surface
Let's figure out how to insulate a floor in a dacha with your own hands. I will consider the option with a wooden floor, since this is what is found in the vast majority of cases. To keep the structure as warm as possible, you should follow a few simple tips:
- Insulation of floors in a dacha begins with filling the space under the floor with sand, no empty spaces through which frost and wind can travel. One of my friends spent a lot of time and money on expensive insulation, but the floor became warm only after he filled the space underneath with construction sand and waterproofed the surface. Cold and dampness are what an empty underground gives you;
- Next, the logs are laid, the height of which should be 20-25 cm; this is exactly the layer of insulation that we will lay on the surface. The distance between the elements should be such that you can lay the selected material without cutting, this will simplify the work process and improve the final result;
Boards with a thickness of 40 mm or more can also serve as lags.
- Then the surface is covered with insulation; it is best to use mineral wool, as it retains heat well and is easy to use . The work uses inexpensive rolled material 100 mm thick, which is laid in two layers. The insulation should adhere to the structure as tightly as possible, so when cutting, make the elements 3-4 cm larger than the distance between the joists;
This floor insulation is cut using a construction knife, which is very convenient.
Of course, you can use foam plastic or mineral wool in the form of slabs as insulation; in this case, you need to place the elements with offset joints to prevent the appearance of cold bridges. All joints that are not tight enough are filled with polyurethane foam; this should also not be forgotten.
The joints between the insulation sheets must be offset
Before you insulate the floor in your dacha, you must decide on the material and purchase everything you need for the job. Of course, you can use sawdust or expanded clay, but these materials will not give the desired effect unless they are sprinkled in a 40 cm layer. Therefore, rely on the experience of many developers and choose what works.
To ensure the best effect, the surface is covered with a vapor barrier material, after which it is covered with either a floorboard or sheet elements; it all depends on your project, because the floor can be finished with a variety of materials.
Stage No. 5 - wall insulation
It is through this part of the structure that the greatest amount of heat is lost, and this is no wonder, because the walls are the largest part of the structure by area, which opens to the open air, and is not covered by soil or roofing, like the floor and ceiling.
Let's figure out how to insulate a country house with your own hands:
- First of all, it should be pointed out that it is advisable to carry out work outside , this is due to the simplicity of the process, the dew point, which moves outward, and the fact that work inside takes up usable space. I will talk about a comprehensive solution in which the walls will be thermally insulated on both sides; this option provides the best effect at low cost;
- At the initial stage, you need to choose insulation for the walls outside; there are two main options: either polystyrene foam or mineral wool. The first solution is characterized by low cost and light weight, the second – by high efficiency. Most often, foam plastic is used, since not everyone can afford to spend a lot of money on a country house;
Polystyrene foam is an excellent solution for a summer residence
- Work begins with leveling the surface and attaching the frame into which the insulation will be placed . The spacing of the elements should be selected in such a way that the insulation is tightly inserted between them without additional cutting. It is important to align the sheathing evenly, since this determines how level the wall will be later; hangers can be used to secure the structure; this will simplify the work process;
The frame is necessary to create cells for insulation
- Then the entire space is filled with foam plastic, the thickness of which should be 100 mm. Everything is simple here: insert the sheets into the cells as tightly as possible, without gaps or voids. If any have nevertheless formed, then fill them with polyurethane foam to prevent the emergence of places for cold penetration;
Insulation is a simple process, but it requires care and attention to detail.
- For additional reliability, the insulation is additionally fixed with self-tapping screws, onto which special pressure washers are placed (this element is called a rondole). Two fasteners per sheet are sufficient; it is important to fix its position and prevent shifting or sliding over time;
- Next, the surface is covered with a windproof membrane, which will prevent the penetration of moisture into the structure and protect the surface from wind loads. The easiest way to attach it is with a stapler;
- To improve thermal insulation performance and ensure unhindered evaporation of moisture from the surface of the walls, a counter-latt 3-4 cm high is placed on top of the main frame.;
- The finish can vary from siding or wood paneling to more expensive solutions or even plastering (in which case oriented strand board is nailed down first).
Imitation timber is an excellent solution for a country house
I am often asked which insulation to choose for external insulation of a summer house. The advice is simple: if funds allow, then use mineral wool or spray foam, but if there are financial restrictions, then polystyrene foam will be an excellent solution, the main thing is to lay it correctly and fill all the cracks with foam.
Modern industry produces excellent insulation for walls inside a country house - penofol. It is made of foamed polyethylene, on one side of which a reflective surface is glued; it has the property of reflecting heat, thereby helping to save energy resources and increase the temperature in the room.
Penofol is an excellent insulation for walls inside a country house
Let's figure out how to carry out insulation from the inside with your own hands:
- First of all, you need to prepare the surfaces; no special leveling is required, because the material is flexible . The main thing is that the base is clean and dry; covering wet areas with penofol is not the best idea, since mold may subsequently begin to form in these areas;
- Next, pieces of material of the required length are cut, it is better if they extend onto the floor and ceiling, thereby isolating the joints , which are areas with increased heat loss. As for fastening, there are two main options: penofol can be attached to wooden walls using a construction stapler, or you can nail slats on top; this option is good if the surface will subsequently be covered with clapboard;
The slats serve both as a retainer for the insulation and as a frame for fastening the lining
- Do not forget about additional insulation of the seams between penofol - they are glued with special metallic tape . This eliminates cold loss through the seams, which will inevitably occur if you do not take care of it in advance. A country house insulated in this way from the inside will be much warmer, and less energy resources will be spent on heating it.
Adhesive tape with a foil surface is sold in the same place as penofol
Stage No. 6 - thermal insulation of the attic
I put this part of the work last, since an attic can not be found in every building, but due to the limited space for construction, the presence of such a room is advisable, because it significantly increases the usable area. But in order to use this part of the building as a full-fledged living area, it must be very well insulated.
Unlike other rooms, the attic is separated from the outside air only by a roofing system, which is clearly not enough to effectively retain heat.
The workflow in this case looks like this:
The diagram shows the correct sequence of work
- First of all, you need to prepare the space, remove dirt and cobwebs, and also remove from the attic everything that could interfere with the work . Easy access should be provided to all surfaces, then you can begin work on laying materials, below is a drawing showing the structure of the structure;
This insulation option is considered classic
- Next, a vapor-permeable membrane is attached, which will act as a water barrier and will also prevent wind from penetrating into the structure. The material is fastened with a stapler; for reliability, overlaps of 10-15 cm are made on the joints;
- As for the insulation, its layer should be at least 150 (or better, 200) mm, the ideal option is mineral wool , but, as a last resort, polystyrene foam is also suitable, all joints between the sheets of which must be sealed with polyurethane foam. When laying, try to achieve maximum density; the fewer cracks and voids left, the warmer the room will be in winter, remember this;
You can build a frame from a metal profile to support the insulation
- Next, the surface is covered with another material - penofol , it allows you to improve the thermal insulation properties of the surface, as well as reflect heat back into the room, which is especially important in the attic, because this is the upper part of the structure and warm air accumulates here. All recommendations for fastening are described in the section above, so I will not dwell on this aspect in detail;
Alternatively, you can use mineral wool with a reflective layer fixed on it, this will reduce the work process by one step
- Lastly, the finishing is attached; here you should also select materials with good thermal insulation properties. Plywood and wooden lining work well, although if you have insulated the attic well, you can use anything.
How best to insulate
After choosing a heat insulator, you need to decide on the method of insulation. Do-it-yourself insulation of a house for winter living can be done using two methods:
- outside;
- from the inside.
Construction of a country house with thermal insulation
Insulating a country house from the inside is important in the following cases:
- work is carried out in winter, when it is not comfortable to perform operations outdoors;
- you must not touch the façade of the building or disturb its decoration;
- insulation of walls at a sufficiently high height.
It is important to remember that insulating the outside with your own hands is more correct from a technical point of view.
Protecting your home from cold air helps prevent the effects of cold on supporting structures and extend their service life.
Rodent control
Cat at work
It's unfortunate, but with the onset of winter, rodents (mice) move from the forest into the house. Moreover, they prefer to build nests in the roof area, where the rare sun provides warmth, heating the tiles. Naturally, the war is all-out , but history repeats itself every year. In the summer, rodents are reduced to zero by the cat; in the fall, bait is laid out, up to 5 boxes of grain. All grain is dragged away by rodents. The first wave dies, but depending on the winter, the next ones come. This is despite the fact that everything edible in the house is inaccessible and all the cracks found are closed. Due to the design of the house, it is not possible to completely repair the foundation. Therefore, during construction, the external frame of the future room was checked for cracks and holes. All possible points of penetration are sealed with bars, and the shaped cracks are sealed with scraps of galvanized iron and, in addition, filled with foam.
Window selection
I can safely say that a wooden window with double frames, glazing and fittings ordered from local craftsmen was half the price of metal-plastic. Now (2011) everything is the other way around. When renovating the adjacent attic room, two metal-plastic windows of a larger (2.5 times) area cost (2008) 4800 rubles. After dismantling the old window, oversized building materials were loaded through the resulting opening - fiberboard sheets for interior cladding. The support post was tied to the fence post, and the crossbar was nailed to the ceiling crossbars. After laying the material, the window, painted brown with stain, was installed.
Old window
Storing oversized items
Lift
New window
New window
Preparing the walls
Before choosing how to insulate a house from the inside, it is necessary to carry out preparatory measures. This includes items:
Sealing cracks in walls and insulation
Wooden beams are dried according to certain rules, microscopic cracks appear and are visible to the human eye, which must be removed. Sealants, resins, and mastics are used for sealing. Polyurethane foam is widely used. If a synthetic sealant is purchased, there should be no acrylic substance.
When using silicone compounds, it is important to purchase a substance with a high degree of frost resistance. Any mixture is introduced to the maximum depth into the cracks, as soon as it hardens, the application areas are leveled
Polyurethane foam is used in places where there will be cladding.
Wood shavings are mixed with an adhesive composition. The gap is cleaned in advance, and the prepared composition is poured into it. After drying, sanding is required for leveling. This method can be used to seal small cracks.
A budget option is to use tow, moss, and other similar compounds
When using them, it is important to treat the cracks with an antiseptic solution and a mixture to eliminate fungus and mold. If the walls are wooden, the joints are sealed only with such mixtures
To prevent the cracks that can grow in the wood from increasing, you need to constantly inspect the beams.
Installation of sheathing
If a private house is made of wood, wooden materials are used. Metal elements can be installed if the walls are covered with moisture-resistant plasterboard. Activities are carried out in a certain sequence. First, markings are applied to install the sheathing.
Its width is selected taking into account the width of the insulation. You need to subtract 3-4 mm from the number. Insulation elements must be installed against the sheathing. This action is not necessary for all types of materials.
Installing racks in corners
To make the corners of the room even, this action is required. The height of the beam 50x100 mm is chosen equal to the height of the room. The small beam is secured with self-tapping screws to the edge of the large beam to form a right angle. The steps are repeated for each corner.
Lathing
For the sheathing, boards are prepared that are installed vertically. After they are secured, the correct installation is checked with a level. The sheathing is installed first in the corners, moving towards the center.
Installation of vapor barrier and waterproofing
Use polymer films for this; a foiled surface is possible. Vapor barrier films are attached using a stapler. Definitely overlap. The joints are sealed with tape. Actions are performed over the entire insulated surface.
https://youtube.com/watch?v=ANw2Utp2I6w
The waterproofing is fixed to the sheathing; space should be left there for ventilation. Roofing felt is most often used. It helps to get dry walls and prevents condensation.
Conclusion
Thermal insulation inside walls is not the most popular way to reduce heat loss in a room. Reduced area, the need for more careful calculations to determine the “dew point” and other disadvantages force owners of apartments and private houses to choose external insulation. Moreover, installing insulation outside minimizes the risk of dampness in the premises.
At the same time, if insulation on the façade side fails (the appearance of the house is disrupted, there are expansion joints at the insulation site), the internal placement of heat-insulating materials can also be made more effective. If you use special technologies and take measures to prevent the appearance of dampness on the walls, the effect will be no worse than that of external thermal protection.
Brief overview of other methods
They also use other technologies, among which there are both outdated, but cheaper, and modern, requiring considerable investments.
Installation of polystyrene foam or polystyrene foam
With the advent of EPS, it became impractical to use conventional non-pressed polystyrene foam (PSB), since it has deteriorated characteristics.
Namely:
- burns and melts, releasing hazardous substances;
- has fragility, due to which pieces break under mechanical pressure;
- not protected from rodents.
In terms of parameters, it is inferior to extruded polystyrene foam, and this can be seen in the table of physical and technical properties of expanded polystyrene boards:
For example, the compressive strength of EPPS is 0.25-0.50 MPa, and that of PSB is only from 0.05 to 0.1 MPa (at 10% linear deformation), water absorption for EPPS is 0.2% of the volume, and PSB has as much as 2.0
However, light and thick slabs are still used when it is necessary to quickly and inexpensively insulate a room. We recommend using this material for cladding garages and utility rooms, that is, non-residential premises.
Spraying liquid ceramic insulation
Schematic representation of the composition of the liquid-ceramic mixture: vacuum microspheres of various diameters and a latex binder mixture enriched with antifungal and anti-corrosion additives
Advantages of liquid ceramic spraying:
- moisture resistance;
- mechanical stability;
- elasticity;
- ease of application;
- environmental friendliness;
- minimal load on structures.
The main advantage is the thinness of the applied layer while maintaining important thermal insulation characteristics.
In terms of efficiency, a 1-mm layer of LCD is equal to a 50 mm thick basalt wool slab and can increase the temperature in the room by 3-4 degrees. Builders love the sprayer for its ease and high speed of application.
After applying the liquid-ceramic mixture, additional hydro- and vapor barrier is not needed. A thin layer can withstand temperatures from -60 °C to +250 °C, and, subject to application technology, lasts up to 30 years.
Entrance door
Entrance doors
To retain heat, a double door was made, the frame was turned from 40mm boards with a hand plane, one door leaf was used from the original, for the second an old balcony door reduced with a saw and chisel was used. The voids in the doors are filled with insulation, and the doors themselves are lined with fiberboard on both sides. In summer, if necessary, one or both doors can be removed.
Installation technology
The technology for installing roll insulation is slightly different from slabs. They begin to insulate the walls or floor initially. The walls are mainly made of slabs, as is the straight ceiling. Therefore, often, floors and pitched ceilings-walls are suitable for insulation and installation. When insulating the floor, it is worth looking at what type of insulation is available.
Insulation in foil is mainly used, but sometimes rolls of insulation are covered with ordinary heat-insulating foil or metal film. The insulation should extend 1 cm away from the walls. This is due to the fact that when temperature changes, the material contracts and expands. The lack of free space in metallized or foil insulation leads to its deformation and damage over time.
Ceiling (pitched) insulation is attached between the rafters, cutting out a little more in order to insert it better between the boards. They are inserted strictly from bottom to top to avoid voids. After installation, the surfaces are clamped with main profiles or boards for application of additional (for example, vapor barrier) materials on top. The work is carried out especially carefully.
Room paneling
Naturally, I wanted to make lining, but the financial situation was not strong and I had to go for the budget option - fiberboard cladding. And what pushed me to the budget option was the lack of finishing nails for the lining in stores, and using self-tapping screws for the lining... Sheets of fiberboard were cut out locally scissors and fastened with conical screws, the seams on the ceiling and walls were covered with overlays.
Fibreboard covering
Partition paneling
Closet
Roof
If installed incorrectly, a roof can “steal” more than 10% of the heat spent on heating the house.
When choosing thermal insulation for a roof, pay attention to its service life, which depends on many external factors: temperature fluctuations, amount of precipitation (especially snow), wind strength and direction. Pay special attention to the water resistance of the material. Isolation must also be safe for health. The first sign of safe insulation is the absence of a sharp, pungent odor.
Insulating the roof with polymer materials is not the best solution. They ignite very easily and quickly, so increased fire safety measures will have to be taken.
The best insulation for roofing can be considered stone wool, which is intended for thermal protection of structures that do not bear heavy loads.
What is the best way to insulate?
A house with a long service life requires not only insulation of the facade, but also all structural elements as a whole. Such actions will help to more effectively retain heat inside the house. Therefore, we will consider all the elements separately:
Wall insulation
It is better to insulate the walls from the outside. This shifts the dew point towards the environment, allowing it to be removed from the substrate much faster. If you insulate the walls from the inside, you can cause a completely opposite result. In this case, the walls will still freeze.
To insulate the walls, we choose hard mineral wool mats. If you have the financial means, you can take the foil version. A layer of foil will reflect heat from the walls. Before installing the insulation, be sure to close all cracks.
In this case, we use a tourniquet, dry moss or tow. With this material we tightly seal the inter-crown space or cracks that may form on the logs.
Ceiling
You can insulate the ceiling in two ways:
- from the side of the room;
- from the attic side.
Both the first and second methods are effective. More rigid materials are laid on the ceiling. If there is an attic under the roof, then it is better to resort to insulation from the side of the rooms. Then a structure is created from beams, between which sheet insulation is placed. Don't forget about vapor barrier membranes.
When there is an attic under the roof, you can use mineral wool and even polystyrene foam. A more rigid material must be laid on top of the insulation. This can be chipboard slabs, which will protect the insulation from being pressed through.
There is an option when bulk insulation is used, for example, sawdust, gravel. But you need a lot of such materials, which can be even more expensive than using modern insulation.
Floor
The choice of insulation technology for a dilapidated house depends on whether there is a basement or not. If there is a basement, then first insulate it. There may be no need to further insulate the floor after this.
But if such a need has already been determined, then choose the following options:
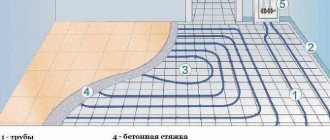
- Laying heated floors (electric heating). Not always suitable for old wooden structures, as it requires reliable electrical wiring.
- Use of thermal insulation materials. They choose only hard options, but be sure to make a plank floor or cover it with chipboard or OSB, and then decorate it with the selected flooring material.
It is in an old wooden house that large heat losses occur due to dilapidated floors. Therefore, you should not neglect the possibility of insulating floors. More precisely, start insulating the house from the floors.