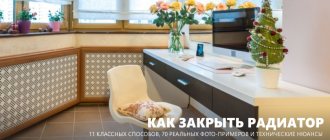
Heating radiators are undoubtedly important for every room intended for human habitation. As a rule, the location of heating radiators is always visible. Therefore, their appearance significantly affects the overall appearance of the room. During the repair process or in preparation for it, the issue of the appearance of heating radiators should be carefully considered. Don't your immediate life plans include renovations? – it doesn’t matter, there are solutions in this case too. Thanks to the availability of information, as well as the ability to purchase a variety of materials, decorating various interior items has become accessible to everyone, regardless of finances and handicraft abilities.
The correct approach to decorating a battery is based not only on the aesthetic component, the functional purpose of the heating device is also important
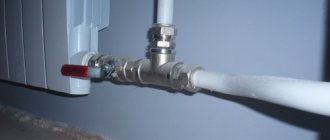
A very unfortunate decision - the movement of warm air is almost completely blocked
Possible decorative options for heating radiators are selected according to a number of parameters. In order for the result of the work to please you, when deciding on the choice of finishing for heating radiators, you should proceed from the following initial data:
- the original properties of the decoration item itself;
- style of the room in which the batteries are located;
- the color scheme of the room and its design style;
- functional purpose of the room.
It’s great if by reading this article you already know what exactly you want. If you haven’t yet decided what to do best, then perhaps after reading it, some great ideas will appear. All you have to do is choose a method for converting heating radiators that suits your means and feasibility if you want to decorate the heating radiator with your own hands.
Decoupage. Technology
Decoupage is an imitation of painting. And any painting requires a flat base. New radiators are produced with smooth-walled sections, so the pattern will fit perfectly. But you will have to work on old cast-iron rarities to level the surface as much as possible and remove layers of old paint, drips and rust stains.
Old batteries require preparation for decoupage
Step one. Removing old paint
Old paint is not easy to remove.
You can try using a solvent. applying it to the surface of the radiator and scraping off the softened enamel with a metal spatula. But if there are too many layers of paint, the option is too tedious. Plus, the pungent odors of solvents have a detrimental effect on health.
How to remove paint
Another way is mechanical. Sandpaper with different grain sizes and an angle grinder with abrasive attachments will be used.
Many craftsmen advise cleaning the surface of batteries using a drill and a brush attachment (wire or polymer-abrasive). Old paint will fly off in no time, but it’s worth coordinating noisy work with your neighbors.
Removing paint from a battery
Repair and auto repair shops often offer sandblasting services. This method is highly effective, but will require dismantling and transporting a heavy radiator.
And another option is thermal. Old paint can be removed by heating the surface of the radiator with a hair dryer, and then scraping off the peeling enamel with a spatula. If there is an opportunity and desire to dismantle the radiator and take it out of the room, then a burner is used for cleaning. All that remains is to lightly sand the cast iron surface.
Note! If the old paint could not be removed for some reason, the surface is leveled with putty and sanded with fine sandpaper. It is not recommended to apply a thick layer of putty, as this will reduce the heat transfer of the radiator.
After removing the old paint, the radiator should be degreased with white spirit and then coated with a layer of anti-corrosion alkyd primer to improve the adhesion of the paint layer to the metal. The drying time of the putty is from 20 minutes to several hours.
Step two. Radiator painting
First of all, you should choose a paint that will meet the following requirements:
- wear and heat resistance;
- no change in the shade of the coating over time.
non-toxic;
In addition, it is recommended to choose paint that matches the wall located behind the radiator. Plus, it is advisable to purchase matte water-dispersion paint (labeled “for painting radiators”), decoupage will look more impressive on it, and during the painting process unpleasant chemical odors will not bother you.
Painted wall and radiator
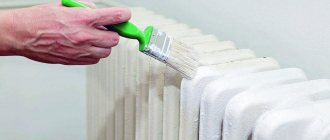
The most convenient way to apply paint is with a fur double-sided mitten. A rubber glove is put on the hand, and a fur mitten is placed on top. This makes it very convenient to paint hard-to-reach areas. Don't forget to place oilcloth or newspapers under the radiator so as not to stain the floor.
Note! Painting and decoupage are carried out strictly after the radiator is disconnected from the heating. Close the valve and wait for the battery to cool down. Otherwise, the paint will lie unevenly.
Video - Painting the radiator
Step three. Preparation of materials
- Napkins (for decoupage or three-layer serving napkins).
- Scissors.
- PVA glue.
- Varnish for decoupage.
Varnish for decoupage
To begin, take a napkin with the desired pattern and separate the layer with the pattern. We measure the battery sections (length and width) in order to cut the napkin exactly to size. We cut the napkins based on the measurements obtained.
Napkins for decoupage
If you don’t have ready-made napkins, you can make them yourself. To do this, find the desired drawing on the Internet. Take a two-layer white paper napkin, place it on top of the printed design and secure it on one side with masking tape. We cut off the excess napkin. Now print out the design you like on a sheet of paper with a napkin attached. Peel off the tape and the napkin is ready.
Napkin for decoupage
Video - How to make a napkin for radiator decoupage
For the living room, it is best to select images of nature and abstraction, for the nursery, cartoon characters are appropriate, and in the kitchen, floral motifs and still lifes will look best.
This completes the preparation. Let's get started with creative design.
Step four. DIY decoupage of a heating battery
Pour the glue into a convenient container, dip the brush and thoroughly coat the first section of the radiator.
Pour the glue into a convenient container, dip the brush and thoroughly coat the first section of the radiator
We take a strip of napkin and glue it with the wrong side to the section of the radiator coated with glue. Smooth the napkin with your hand or a wide brush with soft bristles. If some areas of the strip do not stick, coat these areas with glue directly on top of the napkin. We make sure that no bubbles or unevenness are formed during the process.
Take a strip of napkin and glue it with the wrong side to the glue-coated section of the radiator
The work should be done carefully, since in case of an error it will not be possible to remove the damaged strip without damage.
Similarly, we cover the remaining sections of the battery with napkins.
Similarly, we cover the remaining sections of the battery with napkins.
We rinse the brush from glue and open the acrylic varnish for decoupage, which can be glossy, matte or with various holographic effects. Using light, precise movements, coat the battery with varnish. The varnish will fix the design and give the work a finished look.
Applying varnish for decoupage
If desired, you can use acrylic paint to apply any lines or additional drawings on top of the napkins to make the work truly exclusive.
We wait until the varnish dries and turn on the heating. The work is completed.
Battery Design Ideas
Video - DIY decoupage of a heating battery
Brief overview of popular manufacturers
Retro radiators of both domestic and foreign production are represented on the Russian market of heating devices. Among Russian batteries, the most popular are Radimax and Exemet. Their products are spectacular sectionals, patterned and smooth. Such radiators have gained recognition not only in Russia, but also among domestic consumers. Products are successfully exported to a number of foreign countries. The collections of these companies are represented by a wide model line. Spectacular batteries are also distinguished by a variety of finishes.
Popular foreign brands are represented by the trademarks Viadrus, Demir dokum and GuRaTec. Viadrus is a well-known Czech brand that has been producing retro wall and floor radiators equipped with legs for many years. The company has established itself as a manufacturer of consistently high quality products. Cast iron retro batteries with good heat dissipation are supplied under the Turkish brand Demir dokum; the collection consists mainly of floor-standing models. GuRaTec brand batteries are traditional German quality, a classic range of discreet shapes and a moderate color palette.
Radiator decor
White cast iron batteries are an indispensable attribute of a public place, especially a state one. You can also find such batteries in residential buildings and apartments. This is explained by the fact that cast iron is a durable and practical material. However, what to do when such a battery does not want to fit into the interior of the room, completely contrasting with it? There is an answer - this is the decor of radiators. Every jack-of-all-trades or do-it-yourselfer will be able to revive his cast-iron batteries using practically improvised means, using our master class and tips.
Radiator decor
Technical rules
One of the requirements is the accessibility of the radiator. It may leak and will have to be replaced or repaired. Therefore, it is better to choose designs that are easily removable. It is advisable that they do not have a fixed mount. Overlays with a folding door and a retractable mechanism are suitable. At a minimum, valves, pipe connections, thermal head and threaded connections should remain accessible in case of breakdown.
Instagram @interior_techno
Instagram @bespokecabinets
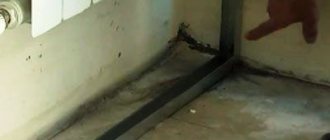
The second important point is related to the amount of heat entering the house. Any box reduces it. Especially if it is deaf, completely closed at the top or has a tight weave. It is better to choose something more open and not place the heater too deep. To reduce heat loss, you can put a solid screen on the legs and cut a groove in the middle.
A few more tips
- Before closing the radiator, prepare it: wash it, blow it out.
- The distance between the masking structure and the heating device should be 35-50 mm.
- The minimum gap between it and the window sill, as well as the floor, is 60-70 mm.
Consider these recommendations when choosing a decorative overlay. After installing it, the temperature in the room should not drop by more than 1-1.5°C.
Decoration method No. 1
Decorating radiators is not such a difficult task, and you will soon see it. The first method is the most common staining. You don't have to paint your radiators white. Indeed, today you can find paints in a wide variety of shades and colors on the market.
Before doing this, you should dismantle the batteries, remove rust, degrease with acetone or burn with a blowtorch or torch.
Places that do not need to be painted should be sealed with masking tape. If the radiator has not been painted, then it must be treated with an alkyd base primer with pigment.
Cleaning the battery from rust and old paint
Decorating radiators using painting is almost an ancient method. And previously, a mitten was used for this; such a device helped to do such work efficiently and without unnecessary smudges and layers. The paint also mixed well.
Let's tell you a little about this method: the mitten itself is made from fur - you take a piece of it, fold it in half, and sew it together to make a bag. Now you need to put the mitten on your hand - but first put on a rubber glove so as not to stain your hand. Next, you can use a mitten to paint the batteries - the paint applies evenly and in a thin layer.
The appearance is determined by the buyer
Cast iron retro radiators are often supplied to the market in factory primer, without a final paint coating. This is done specifically so that the buyer has the opportunity to independently choose the finishing option for the purchased batteries. Sellers can offer the following design options for heating devices:
matte monochrome painting with a choice of colors according to the RAL scale;
two-color painting with highlighting of the ornament;
painting with polishing varnish;
patination of bronze, copper, silver.
Decoration method No. 2
The second method is decoupage of a heating radiator. This method is quite popular, because the result is a stylish product, original and unique. It all depends on your imagination, the materials used and the ability to create the simplest work. So, do-it-yourself decoupage of heating radiators will require some materials:
- Matte white paint.
- Acrylic paints.
- Tassels.
- Decoupage paper with the design you need.
- PVA glue.
- Heat-resistant varnish.
Materials and tools for decoupage of a heating radiator
Decoupage of heating radiators involves following the following stages of work:
- First of all, the surface of the heating devices should be washed and treated with fine sandpaper.
- Now we need to wipe our batteries from dust and dirt, then we paint them with matte paint. You should not use nitro paint, because your batteries were originally coated with oil paint, and if you cover them with nitro paint, they will become covered with bubbles.
- After 18 hours, when the paint has dried, we will begin gluing decoupage paper to the radiators. We dilute the glue so that we can distribute it evenly over the plane. We start gluing from the middle of the motif.
- When the entire drawing is pasted, you can paint whatever you want, make a background and detail the drawing.
- Now we need to cover our drawing with heat-resistant varnish.
DIY decoupage of the heating battery is ready! Now we have stylish batteries that will complement the interior and highlight it. In the photo you can see options for decoupage.
Heating radiators after decoupage
It is worth noting that currently you can choose special stickers for the radiator. Such stickers are created specifically for radiators, so their material tolerates high temperatures well. Stickers and designs on radiators should be chosen from high-quality material so that they do not deteriorate when heated.
What is the peculiarity of 3D gypsum panels in the interior: advantages and disadvantages
Main characteristics of the finishing material:
- health safety - gypsum material does not contain toxic components;
- tolerates sudden changes in temperature;
- improves sound and thermal insulation;
- has a long service life;
- moisture resistance – moderately absorbs moisture. Experts do not recommend using them in the bathroom;
- installation - ease of carrying out work that does not require much knowledge and expenditure of physical strength, as well as time;
- care - easy to clean dust;
- ease of restoration in case of damage.
Various textures, relief images, ease of installation and the ability to cover the material in different colors allow you to create a unique design in your room. However, there are also disadvantages that should be taken into account:
- mechanical impact - the material is fragile;
- It is necessary to thoroughly prepare the surface.
Choosing a pattern is a responsible matter. Some materials reduce space, while others increase it. The drawing can be bright, but at the same time it tires the eyes.
The cladding is combined with other finishing materials:
- With stucco.
- With LED backlight.
- Selecting a specific area in the room - 3D finishing and wallpaper or paint.
Based on everything, you can create a table:
| Gypsum material | Main indicator | Differences |
| Moisture resistance | Moderate moisture resistance, however, use in the bathroom is not recommended | Ease of restoration. To do this, use gypsum putty. |
| Soundproofing | Increases sound insulation, thermal insulation | |
| Temperature | If there are sudden changes in temperature, this does not affect the material | All communications are laid behind the finishing material |
| Lifetime | If you properly care for the finishing material and do not impact it mechanically, it has a long service life | After finishing the work there are no joints that need to be covered with reinforcing tape |
| Care | Gypsum panels are easily cleaned from dust | |
| weight | The plaster finish is relatively light. One piece measuring 50*50 cm is less than 5kg |
Decoration method No. 3
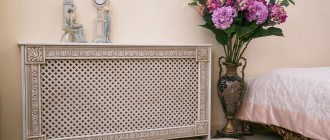
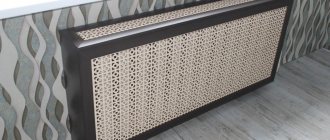
To preserve the style you have chosen for your premises, you can also choose a decorative screen for radiators. How to decorate a heating radiator using a screen or grille? Simply attaching a special device to the radiators will give your interior a finished look.
Radiator screen
Screens for radiators are different. By design they are flat, hanging, mounted, in the form of a box. All this finishing of the heating radiators is selected based on the design of the radiators themselves, the features of the interior, and the wishes and financial capabilities of the owners of the house or apartment.
As for the material of manufacture, screens can be made of metal, wood, plastic, MDF panels, or glass.
Such grilles are an excellent decoration for heating radiators, which will perfectly complement the interior and highlight its advantageous aspects. Installing such devices is very simple, and caring for the batteries will be even easier. And if you change the interior design, you can simply replace the screen with a new one.
If you draw beautifully, you can paint a pre-painted battery with various patterns and colors.
A great idea for decorating a battery is to buy or make a case yourself.
Of course, it will be difficult to find it on sale, but making it yourself is very easy.
It is enough to choose the color of a suitable material, calculate the dimensions of the battery and make a blank. So that the battery heats in the same mode as before, and the cover does not interfere with the spread of heat, you can make its front part mesh.
To do this, either buy thin fabric in the form of a large mesh, or sew your own frame in the form of squares fastened together.
This option for decorating the battery may be more labor-intensive, but you will have the opportunity to decorate the case with bows, artificial flowers, beads and other elements.
Animal-shaped covers will look perfect in a child's room.
Radiator screens
By their design, they are hinged flat boxes corresponding to the size of the radiator. They can be done:
- Made of plastic - economical design. They are considered the simplest and most inexpensive, but at the same time they can imitate any patterned surface. There are plastic screens imitating wood, marble, onyx, granite, brick or other materials.
- Screens made of wood are more expensive, but they also look more impressive.
- Metal grilles can have any decorative pattern and can be a work of art in themselves.
- Glass screens are the most fragile and expensive way to “hide” cast iron batteries, especially if they are stained glass.
The screen can be selected to suit any interior style, and if it changes, simply install a new one.
Today, many people are not interested in how to paint cast iron radiators, but in how to make them truly beautiful and stylish. In modern design, these devices have become interior decoration, conveying the individuality or financial well-being of the owners.
Decoupage batteries
To decorate a battery using the decoupage technique, you need the following materials:
- drawing for decorating a battery using decoupage technique;
- acrylic paints;
- PVA glue;
- white enamel;
- brushes;
- sandpaper;
- heat-resistant varnish.
In order to decoupage the battery, you need to prepare it. To prepare, you need to clean the battery, go through sandpaper and remove excess old paint and create a smooth, even surface.
After sanding, wash the heating radiator and wait until it dries completely. Only then start painting.
To paint the battery, it is better to use white enamel, but not nitro.
After knocking, when the battery is dry, take a drawing or napkin for the battery decoupage technique and measure the width of the outer surface.
It all depends on the design you choose. We glue our drawing in the center of the edge of the battery.
To glue the drawing, take PVA glue and dilute it with water in a 1:1 ratio, in this state it will fit better on the paper.
Having thus glued the entire drawing, you need to finish painting the part of the battery remaining without a napkin with acrylic paints. If you draw well, you can complement the decoupage of the battery with brushes.
When the decoupage on the battery is dry, coat it with heat-resistant varnish.
You can also decorate the battery with other designs. Usually different colors and patterns are used.
Pipe decor
Pipes, like batteries, can be decorated in an original way. There are several options for decorating pipes with your own hands:
- wrap the pipes with thick threads or ropes;
- knit a pipe cover that will be applied to the pipe;
- paint the pipe in original colors, for example, multi-colored stripes.
The last option, which involves painting, may require different paint colors, but is ideal for a child's room.
How to decorate a pipe using a hook and thread
It is enough to simply knit a long knitted strip, the width of which will correspond to the size of the girth of the pipe. The strip may not be circular, and it is not at all necessary to make a cover out of it.
To decorate the pipe, you will only need loops placed in a certain sequence, but you can make them during the knitting process in accordance with the chosen pattern.
A rope similar to a lace will be threaded through these loops, which will be tied either at the bottom, or at the top, or in several places into a beautiful bow.
Pipe decor with rope
Another option for decorating unattractive pipes is to use beautiful structural rope.
It simply needs to be tightly wrapped around the pipes with vertical stripes. To secure the rope while threading its ends, you must use glue.
Decoupage pipes
You can decorate pipes using the decoupage technique. To do this, you will need either a special film for decoupage, which is sold in a craft store, or ordinary napkins with a suitable pattern.
As a rule, shabby chic decoupage involves the use of light, warm and delicate colors. To decorate a pipe, you need to perform the following sequence of actions:
- pre-clean the surface for decorating the pipe;
- apply glue to the pipe;
- cover the surface with a napkin;
- apply glue again so that the entire napkin is soaked through for better adhesion;
- varnish.
You can cut out a design on a napkin if it shows a pattern that specifically suits you. As a background, you can use another napkin with soft colors, which under no circumstances should be cut.
The ideal solution for decorating a pipe using the decoupage technique is to tear it, so the background borders will be smooth.
The decor of pipes can be very different. For example, you can paint a pipe in the shape of a birch tree trunk, and attach sheets of paper cut out to the walls, which will create an original image of a tree, or replace the sheets with artificial ones.
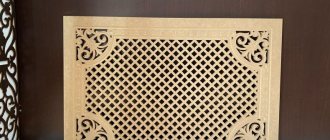
Decorative grille for radiator
The radiator grille is a great decoration and a way of camouflage. The simplest option for creating such a lattice is a structure made of bamboo rods. The rods should be thick, and they should be easy to cut, adjusting the size of the grille to the size of the radiator.
The rods can be secured with wire or glue, but the glue will, of course, be less noticeable.
The radiator can be disguised as a fireplace by making a wooden mesh for it, decorated with different patterns. This fireplace fits perfectly into almost any type of interior if it is placed against the wall.
As is the door decor. Decorating pipes, radiators and radiators may require painstaking work, imagination and a lot of time, but with the help of decor you can hide what spoils the appearance of your home.
Many houses still have cast iron heating radiators, and the owners are in no hurry to say goodbye to them. And this is not without reason! After all, they have a lot of advantages, and they satisfy the need for home heating. The main disadvantage of such products is considered to be unaesthetic, but this is a fixable matter and what the creators of the radiators did not provide at the factories is better to do yourself. Finishing radiators - this will be discussed in this article.
Modern cast iron radiators
Decorating pipes
When considering possible options for masking the heating system pipeline in an apartment or house, three methods can be distinguished, among them:
- decor;
- camouflage using a box;
- hiding in walls or floors.
If you prefer the option in which the pipes are hidden inside the floor or walls, then you must remember that old pipelines cannot be decorated in this way
It is important to take into account the linear expansion, which for polypropylene products reaches 5 mm
During pipe laying, the required number of expansion joints must be provided. If you plan to lay metal-plastic products, then before walling them up in the wall, you should put on special casings that will reduce heat loss. If we are talking about pipes with detachable fittings, then laying them in walls or floors is unacceptable. In this case, it does not matter what material underlies the communications.
If you want to decide how to close radiators and pipes, you must first consider photos of such work. Before masking the leads to the batteries, you should draw up a route for laying the main line. It is used to create recesses in the places where the pipes will be located.
The wall material is grooved taking into account the thickness of the mortar for sealing and laying thermal insulation. To securely fasten the products in the wall, it is necessary to make holes into which brackets and dowels are inserted. Once you have prepared the holders, you need to put a casing on the pipes and lay them in the wall.
Possible decoration options
If you ask a homeowner how he can quickly and inexpensively make beautiful heating radiators in his home, he will most likely have difficulty answering.
And the box just opened...
Decoupage of an old battery
There are a lot of options that will help transform heating devices and give them a coziness that suits you. Let's list possible methods that can help create beauty and complement the interior design of a room:
- Performing decoupage on heating radiators is a fairly common option, which designers are in a hurry to offer to all owners of a hydraulic heating system not only for private houses, but also for apartments. A very effective and, most interestingly, economical method that allows you to transform your room in just a few hours.
- Hand painting is a decoration method that is very common among creative people who don’t feed them bread, but give them something to decorate. If you have the zeal, why not shoot two birds with one stone - satisfy your desire and decorate your cast-iron battery.
- Painting the radiator is another option that has been adopted not only by private owners, but also by manufacturers. The only difference is that if the first one needs to put in a certain amount of effort, while spending very little money on paint and varnish materials. The manufacturer immediately offers to buy a ready-made and painted battery, but the problem is that the price for such a product differs significantly.
Important! Decorating by painting radiators is a rather labor-intensive and painstaking process, so not every owner of a private home will want to use this method. In addition, advice immediately follows from this - use painting if your heating system is at the construction stage or you are going to repair radiators.
- Hiding behind a decorative screen - if you have no creative ideas or desire, you can simply hide the battery behind a beautiful decorative screen. The method is simple, reliable, economical and fast, which is why it is also quite often used in everyday life by apartment or private property owners.
Important! When creating a screen, select materials so that they do not interfere with the flow of warm air, otherwise the room will not warm up enough.
And now the most interesting part - because next we will talk about how to finish heating radiators with your own hands. Let's take a detailed look at the most economical type of decoration - decoupage: where it is used and how to make it at home.
Installation details
If you have to install cast iron batteries yourself, you need to take into account some important points. Antique items are not hung on the wall.
Depending on the type of existing system (one or two pipes), you need to select suitable additional elements: couplings, shut-off valves, etc. Balancing valves are difficult to install.
Before you start installing devices,
you need to learn the following requirements and strictly follow them: You can also make a retro heating radiator yourself . To do this you need a little imagination, temperature-resistant paints and the radiator itself. You can purchase such a radiator from some owners or even get it for free.
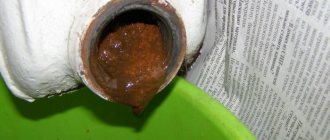
To give it an antique look and decorate it, you need to remove the old paint.
Any solvent will do for this. Next, the unit needs to be painted with powder paint, which will be resistant to high temperatures. Next, design ideas come into play - various beautiful patterns are applied to the surface of the device. The last step is to apply two layers of varnish, after which you can begin installation. Source
What is decoupage and how did it appear?
Today, photos of decoupage of heating batteries can easily be found on the Internet and in catalogs of designers who so kindly offer services in this matter at a high cost. Why pay if it’s easy to do it yourself? Although we’ll talk about this a little later, for now let’s dive into history to see when decoupage appeared and what it was used for.
Art originated in China at the dawn of the 12th century, and subsequently smoothly migrated to Europe, where it was most widely used in France. The method is based on cutting out various shapes or patterns from fabric, leather or paper, and then gluing them onto some surface.
In those days, decoupage was performed on:
In general, as soon as China shared the art, Europeans immediately began to apply it wherever possible. Well, today this method has smoothly transferred to radiators, allowing owners of private houses to decoupage heating radiators with their own hands without the help of designers.
Decorative panel made of decorative plaster
Panels made of decorative plaster give the room an extraordinary look, as they add texture to the surface and three-dimensionality of the image.
Modern decorative plasters make it possible to create a wide variety of color and texture variations: imitation of marble, stone, aged wall, cracked earth, wooden texture, silk or velvet. Usually these are ornaments from which entire paintings are created, with layer-by-layer application of plaster. The result is a feeling of space.
If you provide proper lighting for the walls with panels, such decor will not only attract the eye, but will also awaken the desire to touch.
Manufacturing technique
The surface for plaster panels does not require special preparation. The main thing is that it is durable, clean and treated with a special primer.
First, a sketch of the image of the decorative panel is made, which is transferred to the wall. The relief elements of the panel are sealed with paper adhesive tape. These parts are made gradually layer by layer. Then the surface is sanded and coated with protective varnish.
The end result is not only a great finish, but also a hard coating that is difficult to damage. If this happens, the panel is restored without any problems.
See all the photos to see what panels can be created from decorative plaster:
Decorating heating radiators using decoupage method
Preparing the battery for painting
Well, now let's look at how this decoration is done, what is called under a microscope. As mentioned earlier, this job is very simple to do, to convert the radiator you will not need many things, but you will need the following:
- several brushes for painting, preferably the largest and softest ones;
- napkins with ornaments;
- PVA glue;
- small container with water;
- scissors;
- pencil and ruler;
- fine-grained sandpaper;
- heat-resistant varnish – choose for yourself what effect it will have.
Now a few words about choosing a napkin for converting a radiator; they are chosen out of the need to emphasize the batteries or simply to disguise the product to match the design of the room. The same is with varnish - its choice is based on your preferences and goals that guide you. This is clear, so now you can start decorating:
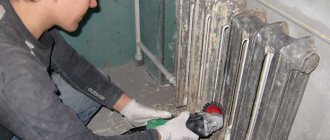
- Cleaning and washing. Finishing radiators begins with sanding them with sandpaper. This is necessary to remove any unevenness, defects or poorly applied paint. In addition, you need to prepare the area for applying the glue, which is why stripping is done first. After the work is done, you should rinse the battery with water and then leave it for a while to dry.
Painting a cast iron battery
Advice . Before moving on to the stage of gluing your napkins, it would be advisable to place a towel or an old newspaper under the heating radiator. This will protect your flooring from getting glue on it. If the material drips onto the parquet, there is nothing wrong with that, but if it is a carpet or a carpet, then problems will arise.
- Preparing napkins. To avoid wasting time while the radiator is drying, you should prepare wipes for application. At this stage, marking and cutting of strips takes place, which will then be glued to create an ornament. If the napkin is multi-layered, you need to separate the top layer on which the design is depicted from all the others - you can get rid of them.
Advice . It is better to remove the top layer before cutting the napkin into pieces - it will be much easier this way, and there is much less chance of damaging it.
- Pasting. When the battery is dry, you can start applying PVA glue to it and gluing your workpieces.
Important! Be careful - the top layer absorbs the glue very quickly, which makes its structure very fragile, so glue it carefully and try to do everything the first time.
- Adjustment. When gluing a layer, be guided by how it will lie in relation to your battery - you can sculpt it, leaving the upper corners of the section untouched, or covering them. Done - the napkin is laid down and now it is important to carefully remove the air that has accumulated under it. To do this, take a second dry brush, and then with smooth movements along the surface, the bubbles are easily removed from there. In addition, your paper may not stick well enough to the edges; to fix this, you just need to go over these places with a brush with glue. Now let the ornament dry and proceed to the next step.
Important! The material has absorbed moisture from the glue, which means its structure is currently unstable - just remember this so that your movements are not rough - this will ruin the napkin.
- Applying varnish. The finishing of heating radiators using decoupage is completed by the stage of applying paints and varnishes. The brush that was used to apply the glue is washed thoroughly. In addition to the fact that the varnish will add completeness to your work, it will additionally bond the napkin with the battery so that the ornament lasts as long as possible. You can, of course, do without the final varnish layer, but then the paper will quickly become unusable - you will have to redo it. You need to apply the material onto the napkin carefully and carefully so as not to spoil it. After applying the first layer, let the work dry, and then proceed to the second.
At this point, do-it-yourself decoupage of heating batteries can be considered complete. Thanks to all of the above, you can easily and simply cope with such a simple job. Now, if you are interested in this method of decorating batteries, you are probably wondering where you can buy everything you need to decorate using this method?
Why we choose cast iron retro
The main argument in favor of this choice is the magnificent design of radiators, stylized in antique style, with exquisite patterns, spectacular decor, a variety of shapes and colors. But there are other advantages to this type of battery. These include:
Long service life - cast iron is not afraid of corrosion, and it is also not afraid of prolonged contact with coolants with aggressive chemical properties. Thanks to this, retro-styled batteries last for a very long time; only manufacturers provide a guarantee for several decades, so a cast-iron device can easily be used for half a century.
Versatility of application - cast iron retro radiators made using new technologies are able to withstand high coolant pressure, so they can be installed at facilities for any purpose, with the exception of multi-apartment high-rise buildings.
Inertness - thick-walled cast iron radiators heat up slowly, but these heating devices cool down longer than any other.
Let's talk about the cons
The main disadvantage of retro radiators is their high cost. Their price can be double, triple, or even more than the cost of aluminum analogues. Another important disadvantage that makes it difficult to transport and install stylized cast iron batteries is the heavy weight of the devices. In addition, radiators of this type contain a large volume of coolant, which increases their inertia and prevents the use of thermostatic valves. Well, we have already mentioned weak heat transfer. That is, to heat a room with a cast iron radiator, you need to use a larger number of sections than is required for, for example, a bimetallic radiator. The increased number of sections in the battery automatically increases the cost of the retro heating device.
The best solutions for the kitchen
The design of kitchens, not as strict as is customary for living rooms, gives free rein to imagination. In addition to the above-described ways to hide heating radiators, in the rooms where culinary masterpieces are created, designer delights are also created to decorate heating radiators. The radiator and the pipe connecting it to the heat source can be painted in the same color as the walls, decorated using the decoupage technique, or these two methods can be combined.
A battery painted to match the walls will be less conspicuous
An even greater effect can be achieved if you paint the battery to match the wallpaper
The battery can be displayed as part of an artistic composition
Many ideas are available on the Internet. Taking them as a basis, you can create a masterpiece on your own and without much labor or time, decorating the external elements of the heating system with an elegant or cheerful design. Battery decoupage involves transferring a design from a carrier onto the metal surface of a radiator. When decorated using the decoupage technique, batteries can be decorated using ready-made designs made on thin paper (both rice paper and ordinary decorative napkins are suitable). There are a lot of design options: flowers, wood decoration, geometric designs.
Rainbow battery
Khokhloma painting on a heating radiator
If you have artistic abilities, then you can do without ready-made solutions and apply paint directly to the surface. For such work you will need heat-resistant paints and varnish. The latter is necessary for those who decide to decoupage the battery themselves. For decoupage you will also need glue; regular PVA will do.