Such a popular material as clay is actually a sedimentary rock. In the initial state, clay is a dusty powder, but when water is added it acquires plastic properties. The composition of clays can vary significantly, since in addition to the main components they contain various impurities. Typically, the base is made up of substances such as kaolinite, montmorillonite, and silica sand.
It is the composition that largely determines the plastic properties of the final material.
Why does clay crack?
The surface of the clay layer can crack for various reasons, and yet why this happens, consider the probable reasons and find out what to do to prevent the clay from cracking when drying:
- excessively thick layer. To avoid this, plaster with clay, applying a maximum two-centimeter layer. If there is a need to apply a second one, then the previous one should set well. In good weather, this takes at least a day. If it is intended to apply a plaster layer more than four centimeters thick, the surface must be reinforced with steel mesh;
- the plaster dries too quickly and begins to crack. Optimal conditions for this are 10 – 20 degrees Celsius. If the weather is hot, it is recommended to suspend work and moisten the walls more often. Perhaps the base of the wall quickly absorbs moisture. In this case, it is also moisturized abundantly;
- the solution turned out to be too greasy. Replace the clay or reduce its amount in the solution. The same applies to cement material.
Craft product Modeling Need help Hello dear craftsmen and craftswomen Need your advice Clay
Even with instructions.
Nadezhda was very happy and immediately began sculpting.
This is what she made. But as it dried, the clay began to crack and literally fall apart.
Yellow cosmetic clay, bought at a pharmacy (you can’t go to any lengths to make a child happy).
The flowers fell off almost immediately.
Just pick it up and you are left with a piece of the craft “as a keepsake.”
She also made such a dog as a gift for my sister.
But unfortunately, all that was left of her were photographs. The dog itself fell apart and we couldn’t put it back together.
Thanks to everyone who stopped by. And special thanks to those who will help solve our problem. Maybe she did something wrong? Maybe wet it with more water? Maybe we shouldn’t touch the craft until it’s completely dry? Or there are other secrets that we don’t know about. I myself have never worked with clay and cannot give any advice.
buy self-hardening clay at a craft store that does not require firing. You most likely bought a different material than your child had previously worked with. Don’t despair. Try to find a good store with a good sales consultant and don’t hesitate and take your time to look at everything what they will offer you. I wish you and Nadyusha creative success!
Thank you. There was another clay in the store, light, probably just self-hardening. It’s just that this one weighed 1 kg, and that one was already 2.5 kg. So I didn't take it. I'll go and have a look again.
Try to sculpt something flat; you need to dry the clay on a plastic board, on glass, on hardboard, on something that does not deform when drying.
And come visit, maybe you will find useful information)) https://stranamasterov.ru/node/196219 Thank you very much for the advice. My daughter will come home from school, we’ll definitely go in and have a look.
I'm very sorry about your crafts.
Thanks for the advice. We tried the dough. somehow it didn’t go very well either. At first she was delighted with the dough and began to sculpt, but the layer was thick and it also cracked. So the cat was left unpainted, but I didn’t throw it away. lies now waiting in the wings.
I completely agree with Firefly. I would also like to add that it is good to dry clay products on newspaper, it absorbs moisture.
There are often pebbles in it, which can also cause the product to crack.
Svetlana, thanks for the advice. We will definitely use it and try to sculpt again, perhaps during the holidays. And now we need to finish the quarter and half of the year. I really liked your work. Especially tea and coffee fish.
Thank you so much for the tips! But new questions have arisen again. How to determine whether the work is dry or not? And I really want to try to burn it, but how to do it? It says in a muffle furnace, but at home there is only a household gas furnace, and the temperature in it is only up to 240 degrees, but it should be more than 800. And how long does it take to fire? I would be very grateful if you could help me with this as well.
Thank you. We are also just starting, or rather, only our daughter for now, and I’m thinking of joining her later.
Source
Types of clay-based plasters
Let's consider the main options for plasters and the technology for their preparation.
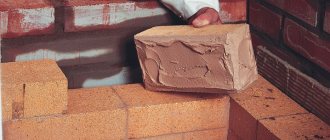
Fireclay clay
Difficulties arise in the work, the bricks hold weakly in the masonry, the plaster layer is covered with numerous cracks. This is due to the fact that during the firing process the clay almost completely loses its plasticity, which must be returned to it when preparing the solution. In these cases, craftsmen recommend adding quartz sand or a special adhesive composition. The procedure for preparing the solution is as follows:
- you will need a pack of fireclay powder, which is poured into a container;
- water is added gradually until it covers the entire mass;
- it is necessary to wait three days for the material to infuse;
- after this sand is added. If the solution turns out to be thick, you can add water, otherwise the clay layer will crack when it dries;
- The mass is thoroughly mixed.
A properly prepared solution should resemble thick sour cream in thickness, only in this case it will not drain and will adhere perfectly to the surface. To speed up the drying process and take measures to prevent the clay from cracking, it is necessary to add cement at the rate of two kilograms per package of fireclay.
It is possible to purchase ready-to-mix formulations that do not require steeping for three days.
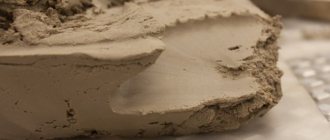
Clay-sand mortar
How to properly make such a solution so that the clay does not crack? First you need to sift the sand, for which you will need a sieve with a hole size of 2 - 3 mm. Its amount will depend on the degree of fat content of the clay.
The clay is pre-soaked. It is placed in a tank and filled with water, leaving for one to two days. After this, the mass is mixed and passed through a three-millimeter sieve. The result should be a solution that is similar in thickness to sour cream.
We start adding sand. As a rule, one and a half times more sand is required per liter of solution. But when the clay is oily and the solution is prepared in such proportions, then cracks will definitely appear. And with low-fat clay, the layer of plaster will not be durable.
The ratio of sand and clay should be accurately determined. For this purpose, take a liter of solution, to which sand is added in doses, while stirring the mass. The end result should be a material that easily slides off a metal shovel, but does not spread over it.
Clay-sand mortar
What to do to avoid drying cracks
- First of all, of course, follow the technology for making ceramics.
- Secondly, to achieve a relatively uniform thickness of the walls and bottom of the product. If you are sure that the thickness of the walls and bottom is approximately the same, then this is already half the success. Sometimes you can remove excess thickness before finishing the job. If you did not have time to “finish” the product directly during creation, grooving the bottom can help, but for this the product must dry enough so that no deformation occurs during post-firing processing.
- Thirdly, artificially slow down the rate of drying of ceramics. In such cases, ceramics are placed to dry in cool rooms, but without drafts, since a sharp change in the rate of moisture evaporation from the surface can again lead to uneven drying. In any case, the batteries should be kept away from the ceramics, otherwise the drying will again be uneven. You can also artificially and slightly increase the air humidity in the room, or moisten the drying ceramics. But slowing down the drying speed is not always possible, especially when the workshop has only one room.
Therefore, the solution is often to accelerate the drying time of raw products while maintaining its uniformity. Sometimes the bottom of a ceramic product is dried with a hairdryer immediately after production. But here it is important not to overdo it, since a hairdryer can cause uneven drying of the outer surface of the work, which, on the contrary, should be avoided. If the goal is to achieve uniform drying, then proceed as follows
First of all, the product must be placed with its bottom on a moisture-absorbing surface; the classic option is a plaster circle or plaster stand. But plastic will not work. As a last resort, you can put regular newspaper, which, due to its “looseness,” absorbs moisture very well. Our next task is to ensure uniform drying of the walls and bottom. When drying, ceramics are sometimes placed in bags or covered with glass caps
If the goal is to achieve uniform drying, then we proceed as follows. First of all, the product must be placed with its bottom on a moisture-absorbing surface; the classic option is a plaster circle or plaster stand. But plastic will not work. As a last resort, you can put regular newspaper, which, due to its “looseness,” absorbs moisture very well. Our next task is to ensure uniform drying of the walls and bottom. When drying, ceramics are sometimes placed in bags or covered with glass caps.
For uniform drying, the thin wall needs to dry in the same amount of time as the thicker bottom. Therefore, the optimal option is when the walls of the product are covered (a plastic bag selected according to size is quite suitable), and air access is provided to the bottom. However, here you need to take into account the dimensions and not leave the drying ceramics unattended, periodically checking the uniformity of drying of the mass throughout the product.
Nuances of testing clay plasticity
Different clays differ in their plasticity. There are:
- “fat” clays with high plasticity;
- material of medium ductility;
- “lean” clays with a low level of plasticity.
I determine the level of plasticity using a simple method. The clay is poured with water to turn it into a dough-like mass suitable for molding. The material is used to make cylinders seven centimeters long and 30 mm in diameter, the ends are pinched with fingers and slowly torn apart. Plasticity is judged by the shapes that the cylinder takes at the point of rupture, by its elongation. A plastic material is characterized by the formation of a long and thin neck, and if the clay is thin, the neck will be thick and short.
The level of plasticity is determined in another way. Flagella about twenty centimeters long and 1.5–2 mm in diameter are rolled out of the working material and bent into semicircles or pretzels. If cracks appear on the materials at this time, the clay is thin. Cracks that form during bending indicate that the clay is of medium plasticity, and fatty clay can be identified by the complete absence of cracks in the samples.
Alternative methods
A more radical way to get rid of cracks is to install an aluminum frame or another metal. To do this, you need two metal sheets, scissors for cutting metal, and corners. The size of the sheet is measured based on the height and length of the surface to be repaired, cut out and applied to the oven. The sheet is secured at the top and sides with metal corners. After installation, the frame can be painted.
In addition, you can line the stove surface with ceramic tiles. It can also be attached to the top of the frame, but if the cladding is done poorly, cracks will still appear on the stove, only under the tiles.
Advantages and disadvantages of clay compositions
The following features are highlighted as advantages:
- clay is a natural and environmentally friendly product;
- solutions perfectly absorb water and release it, which prolongs the service life of coatings;
- reasonable cost;
- the remains of the used solution are stored for a long time;
- the material perfectly protects the surface from mechanical impacts;
- the elasticity of the material allows it to be applied without any problems;
- Not only internal, but also external surfaces are finished with a clay mixture;
- using the solution, level and decorate the surfaces.
In addition to the positive aspects, clay-based plaster has a number of disadvantages, which explain most cases why clay cracks:
- There is no exact recipe for preparing the solution; craftsmen prepare the mixture using their own experience;
- there is a possibility that the surface will become covered with cracks;
- Such compositions are rarely used; there are few experienced craftsmen who know how to cover a stove with clay so that it does not crack.
Criteria for choosing a solution
Previously, classical solutions were used, taking into account combinations of heat resistance, increased heat capacity and thermal expansion equal to the brick material. To make such solutions, fatty clay was used.
Today you can purchase dry mixtures, certain types of clays and other compositions that simplify construction and repair work. It should be noted that not every such composition has the necessary characteristics - fire resistance, heat resistance, gas tightness.
The solution must be heat resistant, withstand high temperatures and exposure to chemically active substances. In addition, the gas density level must be quite high. The seams do not allow flue gases to pass through, but moisture must pass through the finished mixture for the stove to “breathe.”
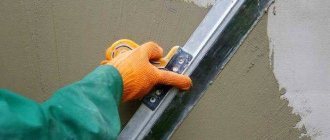
Instructions for applying clay plaster
The work is performed in the following sequence:
- mortar cakes are applied along the wall at regular intervals, and the material is stretched over the entire surface with a wide spatula, a rule or a trowel;
- Evenness is checked using a level. If necessary, apply a second layer;
- the surface is given time to dry completely: from 1 to 3 months, depending on the season;
- finishing is being carried out. To do this, use a solution consisting of clay, cement and sand in a ratio of 1 to 1 to 3. The mixture is applied in a thin layer and leveled. After three to four weeks, the stove can be whitewashed with lime.
We now know how to coat a stove with clay so that it does not crack. But you should know that half the success depends on the correct preparation of the solution.
To make the clay more plastic, you can add glycerin to it.
To prevent the clay from cracking after drying, you need to clean it of various debris and small pebbles. To do this, you need to fill the clay with water, for example, in a basin. Once it is soaked, stir it until creamy and pass through a large sieve. Then you can leave it for several days to evaporate excess water. And in order for the clay to be more plastic, a little simple office glue (it is also popularly called liquid glass) is added to that mass (creamy state). I hope this method will help solve your problem. It was recommended by a professional ceramist on one website.
How long does it take to dry?
It is not recommended to use the oven until the solution is completely dry. When using different materials, this period may vary. Using heat-resistant glue as a putty, the layer of solution will dry within a few hours.
It will take more time for the solution of clay and sand to dry and form. In this case, you will be able to use the stove only after a day. Then the brick oven, protected from cracks with mortar, will remain crack-free for a long time.
Therefore, we do not advise you to rush, immediately flooding your Russian stove with a stove bench. Repairing cracks in a furnace is a simple but important job. The choice of material for the solution is a purely individual matter. The main thing is to do the work carefully and responsibly. Then your house will always be light and clean, without the smell of burning and smoke penetrating through the cracks in the walls of the stove.
During operation, a crack may form on the surface of the stove masonry. This is caused by uneven heating of the material from which the masonry was made. Through cracks pose a danger to people because carbon monoxide enters the room through them. This means that damaged areas must be repaired immediately. But first, it is recommended to find out what needs to be done to prevent the clay from cracking.
Reasons for furnace failure
Before looking for the best way to fix the problem, it is necessary to determine the causes of cracks. It could be:
• low quality of the solution used;
• violation of finishing technology;
• shrinkage of the brick structure;
• non-compliance with the rules for operating the stove.
If the stove sank due to an improperly poured foundation, smoke will pour out of all the cracks during the fire, the doors will no longer close tightly, and the brick will gradually begin to collapse. If such problems are discovered, you should immediately dismantle the entire structure, strengthen the foundation and lay it out again. However, in some cases you can do without radical measures.
All other reasons can be easily eliminated; it is only important to figure out how to cover the stove so that it does not crack.
Diagnosis of problems
The diagnostics of all surfaces will answer the question why a brick stove is cracking. The worst option would be widening through brick cracks. You can’t do this without the help of a specialist; you may need to re-lay the furnace.
Small cracks in bricks caused by high heat allow you to carry out the work yourself. The cracks need to be filled and the surface re-plastered.
Determining the extent of damage
Before getting started, you should consider the damage and determine the scope of work. If small cracks appear on the surface of the stove (even if in large numbers), to eliminate them you will need to remove the lining and clean the brick from the plaster.
For these purposes, you can use one of the following mixtures:
• made of clay and sand;
• from special grouts for ovens;
• made of fireclay clay;
• from oven glue.
Can’t decide what to cover the stove with to prevent it from cracking? Consider each option individually.
Tips and tricks for preventing cracks in stoves
In general, there are no magic rules that can 100% protect your stove from cracks. But there are several recommendations that will help reduce the likelihood of their occurrence:
- regularly carry out thorough preventive inspections of the furnace in order to prevent deformation at the initial stage if something happens;
- condition: choose experienced workers to install the structure so that the finished version is of high quality;
- carefully design the stove, taking into account all the points in the section on the causes of cracks;
- knowledge of what is better to initially coat the stove so that it does not crack.
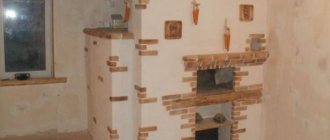
Nowadays, many people have stoves or at least small stoves. They are installed everywhere - in private houses, at dachas, in bathhouses. Whatever the weather, winter or summer, the house will be warm and cozy. Therefore, the topic of servicing stoves will definitely be useful, knowing what to cover the stove with can avoid a large number of problems.
This is interesting: Single-core or stranded wire
A mixture of clay and sand
Sealing cracks with clay mortar is the simplest and most economical way to restore a stove. At the same time, the quality of repairs will be no worse than using newfangled and expensive materials.
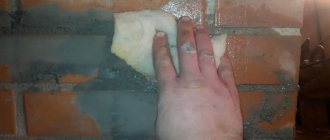
For these purposes, you can take absolutely any clay, the main thing is that it contains as few impurities as possible. After soaking, high-quality raw materials should become oily, homogeneous and plastic. Before covering the stove with clay (to prevent the surface of the fireplace from cracking in the future), pay attention to the specifics of preparing this solution.
How to make your own clay putty
Mixing the mixture is carried out in several stages.
1. Before mixing clay with sand, it should be soaked in warm water for at least 12 hours.
2. The wet solution should be thoroughly mixed and all lumps formed should be broken up. In this state, the clay combines with sand much better.
3. To prepare the working mixture, it is recommended to take 4 parts clay and 2 parts sand. The last component should be as clean as possible and pre-sifted. The volume of liquid depends on the degree of humidity of all components.
4. If you do not plan to whiten the stove, add lime to it at the stage of mixing the solution. All components are mixed until the consistency of sour cream. The finished mixture is covered with plastic wrap and left for 12 hours.
5. The settled solution is kneaded again. To check if there is enough water in it, take the putty in your palm and roll it into a ball. If it starts to crack when you squeeze it, add more water.
6. The oven should be lightly heated, water should be poured over the cracks, after which you can begin sealing.
7. To prevent the appearance of new cracks in the clay, you can add straw, but a more reliable way is to use a plaster mesh. If you apply a clay solution to a stove lined with such material, you can forget about the cracks for a long time.
Fireclay clay
Fireclay clay is often used to restore old stoves. This material is characterized by fire resistance, so stoves finished with it are reliable and durable.
You can purchase this type of clay at any construction market. It is sold in 20 kg bags and is not expensive at all. The working solution is prepared strictly following the instructions on the packaging.
Main components
The clay composition varies depending on the components added:
- clay-sand;
- clay-cement;
- clay-lime.
Stove makers, as a rule, choose the first option. The proportions depend on what clay is used for the oven. If it is oily, the sand ratio will be 2:1, if it is medium oily it will be 1:1. Also, if the clay is of good quality, you can do without additives.
If you don’t want to measure out the components, you can take a ready-made composition. A 20 kg bag of clay-chamotte kaolin refractory mixture “Terracotta” costs an average of 250-300 rubles.
Grout
To seal a brick oven, you can purchase a special grout. In stores there are various formulations that are produced specifically for these purposes. It’s worth noting right away that this option will cost you quite a lot, however, it is optimal for lining stoves and fireplaces.
If you cannot afford to purchase a specialized composition, prepare it at home. To do this you will need the following components:
The clay needs to be thoroughly kneaded, filled with water and set aside for 12 hours. After the specified time has passed, the required amount of sand should be added to the mixture. In the process of kneading the two components, finely chopped straw and salt are gradually added to them. Clay and sand are taken in a ratio of 4:1, with about 50 kg of straw and a pack of salt added for every 4 buckets of clay.
The resulting composition can withstand temperatures of more than 1000 degrees.
How to eliminate cracks in a metal structure?
The main solution to the problems of cracks in metal stoves is obvious - welding is used. But if this option is not suitable, you can use special fire-resistant putties.
Recipes for preparing mixtures are presented in the tables.
Oven glue
To prevent the stove from cracking in the future, you can use heat-resistant glue to repair it. It belongs to the category of ready-made materials for finishing fireplaces, which are sold on construction sites. Its main qualities include resistance to high temperatures and durability.
This adhesive mixture contains fireclay powder and fire-resistant types of cement. Today, there are two types of glue - plastic and hard.
The first option is used for sealing cracks, and the second is intended for plastering the entire surface of the stove.
The main advantage of oven glue is its very fast drying, so you should not mix the solution in large quantities.
The importance of plastering work
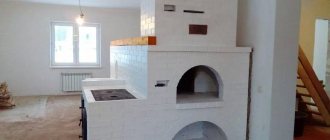
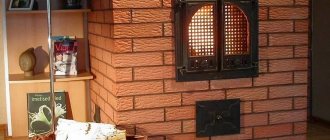
Furnace finishing options are not limited to just applying layers of plaster. The cladding is done using fireclay or ceramic tiles, decorative stone, metal elements, and is also completely abandoned if the “bare” stove masonry looks neat and stylish. However, plastering, which was practiced by our ancestors, has its advantages and practical benefits:
- correction of masonry defects;
- leveling the surface of the walls;
- protection from insects that make nests in the seams between bricks;
- preventing the release of carbon monoxide into the room through cracks and gaps in the finishing layer;
- reducing the risk of fire;
- increasing heat capacity, which allows you to heat a house using less fuel;
- safety during operation, since the surface of the oven does not heat up to temperatures that could harm people.
In addition, plastering is an accessible and low-cost process.
It is also worth taking into account its versatility and flexibility in use. Plaster is effectively used in working with all types of stoves, from finishing from scratch to restoring old structures, and decoration possibilities are limited only by imagination